Pages

Thursday, January 31, 2013

Kitchen Demo Phase 1

Our home is 23 years old. There are a lot of things that I wonder about since we moved in almost six years ago. 

1. Why on earth did the contractor place certain electrical boxes in strange places?
2. What the heck was the soffit hiding up there above my cabinets? Wasting space in my 
     opinion.
3. When would Rob want to start ripping cabinets and other items out to find answers to 
     these questions?

Well the answers to the last two questions were figured out on Sunday. The first question will never be answered probably.  The day after the ice cream party Rob took on the task of ripping out cabinets and soffit. First thing that came out was the small cabinet above our enormous refrigerator.  It served no purposed when even I at 5'10" could not easily reach it.

Thankfully the old fan above the stove was coming out as well.  It was gross and I wanted to somehow put a microwave up there in the future. We are tying to figure out now how we can go about putting that into the plans. Considering microwaves are actually less expensive than range hoods I may get my way.

Taking the soffit out was no easy task. However, we are glad we uncovered it because we found many surprises behind it that should not have been back there.  Including a hornet's nest and stink bugs. Can stink bugs just get up and leave already? I'm sick of them.

We finally figured out what the soffit was hiding. It was a simple pipe that jutted out just next to the window.  See it below in the top left corner of the photo? No electrical wires that were too complicated existed in there.  Thankfully we know of an excellent plumber who does work on the side. He came over last night and simply drilled a hole in the two by four above it and moved the pipe up. That way it can be in between the ceiling and the drywall.  He also did it record time too.  

The next steps are having an electrician come over to make some changes in the lighting and placement of junction boxes.  Rob hopes to start dry walling the now uncovered soffit and missing ceiling after that is all figured out. This project is going to take a while that's for sure. But, it will be worth it.

I do have two questions though...

What is your favorite counter top product?  & Have you ever purchased butcher block counters from IKEA? Any advice on either of these would be greatly appreciated!

Total cost for this project so far is $20 since the demo was free. :)  Thanks to my father-in-law for hauling away the debris and we are keeping the old cabinets to place in our garage for storage (at some point)

Thanks so much!

Megan


Wednesday, January 30, 2013

Pinspiration for Party Food

I found a great idea for party food on Pinterest a while back and it was from Ally Cakes's site.  I decided to do it for Wynn's party. They look so pretty and make it a lot easier for people to enjoy rather than standing around one dish with veggies on it.


I made some chocolate lollipops from candy melts and a plastic mold.  Then I put them in a glass spice jar with some sugar and sanding sugar. Then I decorated the outside of the jar with some ribbon from a set from Michaels dollar section.  I saw a pin for lollipops from an Etsy Shop and decided to buy the mold and try it myself.


Thanks for stopping by!

Megan

Monday, January 28, 2013

Ice Cream Party Dessert Table

Wynn's party was such a fun one. We had our lovely friends and family over to celebrate on Saturday afternoon. The theme of course was ice cream.  Here is the dessert table I set up for the party. 

Here are my grocery store cupcakes with fondant toppers from Edible Designs By Letty's Etsy store.
Here is my number three that I made with cardboard and paper shred. Then I had my Rice Krispie Treat cones, marshmallow ice cream cones, and my chocolate lollipops in front of the number 3.
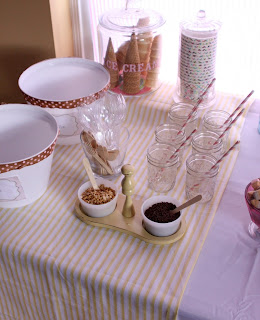
I bought some popcorn buckets from the Dollar Tree and lined the top with ribbon and labeled them with chocolate and vanilla to put the ice cream containers in. Then I had my ice cream cone jar and my toppings containers from the tag sale at Elizabeth & Co.  I had some yellow and white stripe fabric on the table and had pink and white stripe fabric hanging in the background.
I bought these cookies from an Etsy shop. They were delicious.
Here is a close up of the cupcakes.

These beautiful number three lollipops were a special treat from Vintage Confections
We were so happy that everyone enjoyed themselves and that the birthday girl didn't want the party to end. 

Thanks for stopping by!

Megan


Monday
Alderberry Hill
The Gunny Sack
The Dedicated House

Home Stories A to Z
Todays Creative

Skip To My Lou
The Rustic Pig
Craft-O-Matic

Tuesday
twelveOeight

If Its Not Baroque
A Diamond in the Stuff
Elizabeth & Co
Romance on a Dime
The NY Melrose Family
The DIY Dreamer
Claiming Our Space
The Winthrop Chronicles
Full Circle Creations

Adventures of a DIY Mom
A to Z Celebrations

Wednesday
Southern Lovely
We Like To Learn As We Go
The Shabby Creek Cottage
Someday Crafts
High Heels & Grills

Thursday
Frugal Girls
Live Laugh Rowe
A Glimpse Inside
Seven Alive
52 Mantles
Fireflies and Jellybeans
Bloom Designs
House of Hepworths
Momnivores Dilemma
Saving 4 Six

The Taylor House

Friday
One Project Closer
504 Main
Redoux Interiors
The Grant Life
Just Us Four
Thrifty Handmade Days
Tatertots & Jello
Fresh Eggs Daily
Little Inspiration

One Creative Mommy

Saturday

Too Much Time On My Hands
Tutus and Tea Parties
Classy Clutter
Its Overflowing


Sunday
Nifty Thrifty Things
Flamingo Toes
Twigg Studios
Uncommon Designs
Brassy Apple 
I Gotta Try That

Sunday, January 27, 2013

Ice Cream Party Treats

I made these cute little ice cream rice krispie treats for Wynn's party. I simply used peppermint marshmallows, rice krispies, pink candy melts, sprinkles, cones and skewers.  I just used a biscuit cutter to make the round shapes and then dipped the top one in the candy melts to look like a sauce on top.  Then I used a skewer to attach them all. 
I'll post some more of the pictures of the party this week.  Thanks for stopping by! Off to finish demolition of the kitchen. Which we started almost two seconds after the last guest left the party. :)

Megan

Monday
Alderberry Hill
The Gunny Sack
The Dedicated House

Home Stories A to Z
Todays Creative

Skip To My Lou
The Rustic Pig
Craft-O-Matic

Tuesday
twelveOeight

If Its Not BaroqueA Diamond in the Stuff
Elizabeth & Co
Romance on a Dime
The NY Melrose Family
The DIY Dreamer
Claiming Our Space
The Winthrop Chronicles
Full Circle Creations

Adventures of a DIY Mom
A to Z Celebrations

Wednesday
Southern Lovely
We Like To Learn As We Go
The Shabby Creek Cottage
Someday Crafts
High Heels & Grills

Thursday
Frugal Girls
Live Laugh Rowe
A Glimpse Inside
Seven Alive
52 Mantles
Fireflies and Jellybeans
Bloom Designs
House of Hepworths
Momnivores Dilemma
Saving 4 Six

The Taylor House

Friday
One Project Closer
504 Main
Redoux Interiors
The Grant Life
Just Us Four
Thrifty Handmade Days
Tatertots & Jello
Fresh Eggs Daily
Little Inspiration

One Creative Mommy

Saturday

Too Much Time On My Hands
Tutus and Tea Parties
Classy Clutter
Its Overflowing


Sunday
Nifty Thrifty Things
Flamingo Toes
Twigg Studios
Uncommon Designs
Brassy Apple 
I Gotta Try That

Thursday, January 24, 2013

Valentine's Day Mantel


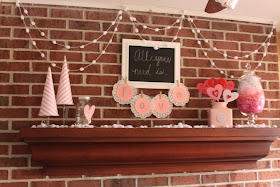
Many of the projects I have shared over the past few posts are now in a new spot on my mantle. The fall mantel I did was the first time I ever decorated my mantel for anything besides Christmas. I have been encouraged to decorate it more now that we are spending more time in this room. Plus I think think the colors of Valentine's Day make me smile.  

Here are my Valentine's trees and my mason jar wrapped in jute with a paper heart. I have seen a lot of these mason jars decorated on Pinterest. It was a quick and easy addition to the mantel.
My felt heart bouquet and ombre jar are on the other end of the mantel.
Here is my chalkboard frame sign hanging in the middle.  It's my favorite part.

Thank you for checking out my mantel. I added some pom yarn hanging from the top to break up all the brick I wish Rob would let me paint.. :)

Thanks for stopping by!

Megan


Monday
Alderberry Hill
The Gunny Sack
The Dedicated House

Home Stories A to Z
Todays Creative

Skip To My Lou
The Rustic Pig
Craft-O-Matic

Tuesday
twelveOeight

If Its Not BaroqueA Diamond in the Stuff
Elizabeth & Co
Romance on a Dime
The NY Melrose Family
The DIY Dreamer
Claiming Our Space
The Winthrop Chronicles
Full Circle Creations

Adventures of a DIY Mom
A to Z Celebrations

Wednesday
Southern Lovely
We Like To Learn As We Go
The Shabby Creek Cottage
Someday Crafts
High Heels & Grills

Thursday
Frugal Girls
Live Laugh Rowe
A Glimpse Inside
Seven Alive
52 Mantles
Fireflies and Jellybeans
Bloom Designs
House of Hepworths
Momnivores Dilemma
Saving 4 Six

The Taylor House

Friday
One Project Closer
504 Main
Redoux Interiors
The Grant Life
Just Us Four
Thrifty Handmade Days
Tatertots & Jello
Fresh Eggs Daily
Little Inspiration

One Creative Mommy

Saturday

Too Much Time On My Hands
Tutus and Tea Parties
Classy Clutter
Its Overflowing


Sunday
Nifty Thrifty Things
Flamingo Toes
Twigg Studios
Uncommon Designs
Brassy Apple 
I Gotta Try That

Monday, January 21, 2013

Love Is Unmeasurable Sign

I bought a large lot of rulers from eBay. I should have just driven about ten minutes down the road to pick them up, because after I bought them I realized it was from someone nearby.  They were only a dollar for 10 rulers.   I wanted to create this sign below and make a heart from the rulers. I am not so great with the jig saw, so Rob agreed to help me out with that part. I used a piece of extra counter top from our built ins, a wooden word cut out for the Love from Michaels, and then sticker letters for the rest.  The entire project cost $2.50 approximately. 

Another simple, sweet and inexpensive Valentine project that I think I can leave out for a little longer too.  I paired it with my Ombre Decoration in my family room.

Thanks so much for stopping by!

Megan 


Monday
Alderberry Hill
The Gunny Sack
The Dedicated House

Home Stories A to Z
Todays Creative

Skip To My Lou
The Rustic Pig
Craft-O-Matic

Tuesday
twelveOeight

If Its Not BaroqueA Diamond in the Stuff
Elizabeth & Co
Romance on a Dime
The NY Melrose Family
The DIY Dreamer
Claiming Our Space
The Winthrop Chronicles
Full Circle Creations

Adventures of a DIY Mom
A to Z Celebrations

Wednesday
Southern Lovely
We Like To Learn As We Go
The Shabby Creek Cottage
Someday Crafts
High Heels & Grills

Thursday
Frugal Girls
Live Laugh Rowe
A Glimpse Inside
Seven Alive
52 Mantles
Fireflies and Jellybeans
Bloom Designs
House of Hepworths
Momnivores Dilemma
Saving 4 Six

The Taylor House

Friday
One Project Closer
504 Main
Redoux Interiors
The Grant Life
Just Us Four
Thrifty Handmade Days
Tatertots & Jello
Fresh Eggs Daily
Little Inspiration

One Creative Mommy

Saturday

Too Much Time On My Hands
Tutus and Tea Parties
Classy Clutter
Its Overflowing


Sunday
Nifty Thrifty Things
Flamingo Toes
Twigg Studios
Uncommon Designs
Brassy Apple 
I Gotta Try That