Pages

Sunday, September 29, 2013

Shadow Box Bracelet Storage

I had enough with my bracelets being stowed away or in a tangled mess somewhere else. I made up my mind to make an organizer for them, and a place where I could display them. That way I will also remember to actually wear them or maybe Wynn would remember to wear one.


I took a shadow box that I found on clearance at Michaels and removed the glass piece in the front. Then I wrapped the backing in a fabric piece I had gotten in a fat quarter package. I attached the fabric with Mod Podge.
Then I just laid it flat on top of my dresser with my bracelets inside. I was thinking about making some dividers for it, but I like the fact that the bracelets are just simply placed inside of it. It is on top of a pretty large dresser, so it does not take up too much room. Plus I like to see my pretty fashion jewelry.


Friday, September 27, 2013

This is Me September Photography Challenge - The Bump Updated

Amy at While Wearing Heels is hosting a link party to share your self portraits on her blog today. She has been doing themed monthly link ups and they have been a lot of fun. Although, I have to admit I have not always been as prepared for them as I had wished. I did make sure that I took an updated bump picture last weekend to share with you today. This is what I posted on Instagram last weekend:


A lot has changed in the fourteen weeks since I took my first bump picture. These are the only two I have taken from this angle. I wanted to wear to the same dress to really see the transformation.  Be sure to link up to Amy's party!

While Wearing Heels

Monday, September 23, 2013

Dollar Tree Thumbtack Pumpkin

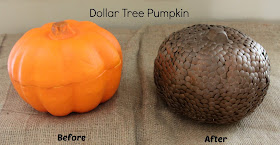
Two years ago I saw the most incredible pumpkins pinned on Pinterest. They were done by Shannon at Madigan Made. (click on the link for the tutorial)  I've made a few of these since, and I absolutely love them.

All you need to get is a pumpkin and push pins from the Dollar Tree. I then wanted to have something other than the typical brass or silver coloring, so I used some leftover metallic spray paint to finish the pumpkin off.

The pumpkin sure does gain some weight once all those thumbtacks are added. I used approximately four boxes of tacks per pumpkin. That makes it about four dollars a pumpkin since all of the materials came from the Dollar Tree.  I literally just sat there during my favorite shows and just kept adding tacks until I was done. 
Thanks so much for stopping by today! Enjoy your week.


Sunday, September 22, 2013

Google Nexus 7 Tablet and DIY Tablet Stand

We were supplied with this product by Staples to provide a review and show how we are able to use it in our own lives. On top of that we made a tablet stand for it to prop it up on a counter top or table when we need it in a hands-free situation .  Tablets have been around for years now and there are many options out there.  The Nexus 7 tablet from Staples may very well be one of the best 7 inch tablets out there.

On the Staples website there are several choices you could make when purchasing a Nexus tablet.  They offer new and refurbished tablets, refurbished is nice if your on a budget, although the price for a new Nexus 7 is quite low for all that you get.  With over forty three customer reviews you are able to see that customers who have purchased this tablet have been very happy with their purchase.

The Nexus 7" is light weight at just over a half of a pound, portable, fast and has an 1080p HD screen.  If you have an Android this tablet offers a seamless transition with no learning curve, just sign into your Google account and your apps will be loaded over Wi-Fi.  Once you log into your accounts all of the data you have on other devices will be right there ready to use.

As many of you already know we get most of our inspiration from Pinterest. There are many ways to access our Pinterest boards now days.  However, many of my pins have links to YouTube videos, and not all tablets will allow you access to YouTube.  The Nexus 7 allows you to use Youtube and I am able to have the tablet in my workshop along with me.  We do not normally do sponsored posts or reviews on our blog, but if we find something that helps us with our projects we will. The tablet makes it a lot easier when I am trying a new project, because it can fit virtually anywhere I need it to be.  It can sit on my workshop bench on the stand I created for it, and I am able to follow the plans or video I am using at the time.

I do most of my pinning when everyone in our house has gone to sleep for the night, and I can sit down and watch television.  I had been using my phone to pin different projects since joining Pinterest. I tend to pin links to projects that interest me and I would like to eventually try.  There are limitations to this the screen on my phone is small and the battery from daily use runs down. With the Nexus 7, I am able to have a larger view of the pins, have an easier time reading the ideas shared by some of my favorite bloggers, and will have plenty of battery left on my phone to call Megan and tell her what project idea we should try out next.  The battery on the Nexus 7 lasts over 10 hours for when you are browsing the web.

Now with the Nexus 7, I can put the phone down and pick the tablet and scan through pictures on Pinterest, post our blog projects on Google+, watch a movie on Netflix, surf the web, or check Facebook.
I was looking around on Pinterest for design ideas for a stand that can hold that tablet up while Megan is using recipes from her Pinterest boards.  I had some old floor boards in the garage from an old front porch, so I thought they would be the perfect material for this project.
I sanded the piece down with 220 grit sand paper and ripped it into a two inch strip.  Then I cut two six inch sections off.  One of those sections I routed a channel on wide enough to fit the Nexus 7 tablet.  
After that I used a biscuit joiner to join the bottom and the back rest together.
Once the glue dried I used some Minwax Finishing Paste. Now the stand is complete and ready to use.
I used two trapezoid shaped pieces on either side of the back of the stand for stability. Thank you for stopping by!  We hope we were able to give you a great perspective on how the Google Nexus 7 Tablet works for us.

Rob


Thursday, September 19, 2013

Chalkboard Cabinet Door


I'm sharing another cabinet door project. We replaced cabinets in our kitchen this year. We used some of our old cabinets for storage in our garage, and other pieces just sat in a pile of scrap wood and pallets. I needed to create a chalkboard for a bridal shower, and was considering finding a frame at a thrift store to use. Then it hit me that I could use this door that was already in my basement.

I taped off the outside of the cabinet with Frog Tape and then used the Rust-oleum chalkboard spray paint on the inside of the door. This was less than $4, and it only took two coats to cover the door.  Then I repainted the rest of the cabinet in white paint I already had.  It was a quick and easy project.
Where the cabinet handle was I added a piece of ribbon, and then prepped the chalkboard according to the directions on the spray paint can. I am happy with how this turned out, and I think I'll hang it in my kitchen after I use this at the bridal shower.
Thanks so much for stopping by! 


Tuesday, September 17, 2013

Cabinet Door Halloween Craft and Halloween Bottles

When we tore out our old kitchen cabinets we held onto some drawers and door fronts. The cabinet door front under our sink sat downstairs in the pile of scrap wood. I repainted it white and then decided to do something for Halloween with it.


I cut out the spider and spider web on my Silhouette, and then added some black and silver rhinestones as well.  


I also added some cut outs in vinyl from my Silhouette machine to various bottles. I did not put anything on the one bottle because it already says Worm Syrup on it. I thought was fit in pretty well with the Halloween vibe. A few quick and easy Halloween projects that make me smile. Thanks so much for stopping by!


Monday, September 16, 2013

Halloween Treat Bag

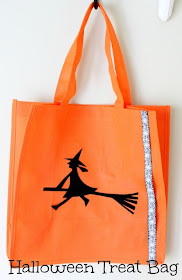
I took a bag from Michaels and some flocked heat transfer vinyl to create a new Halloween treat bag for Wynn. Hopefully we will get to do some trick or treating this year.  Wynn is really excited about it, and keeps asking for her costume already. That's probably because I've already put up Halloween decorations.


I picked up the bag from Michaels for a $1. They had several different colors in stock, and I think they would make great gift bags too.
I cut out this cute little witch from the Silhouette studio images, and then ironed it on the bag. It does take a lot longer than the 60 seconds or so that it says to iron it on the packaging. It always seems to take me several minutes for heat transfer vinyl to stick.  I do like the flocked heat transfer material because it is quite a bit easier to work with.
I also added a little strip of ribbon on the side. Wynn said the bag needed some spiders on it, and so we grabbed a roll of that at Michaels too.

Wynn really likes the bag, and has already asked on a few occasions if I could fill it with candy for her to practice trick or treating. Smart girl! Thanks for stopping by!


Friday, September 13, 2013

Freezer Meals Round Up

Knowing that our home is about to be a little more chaotic I figured it would be a great time to stock up on some freezer meal recipes. I did not do this at all when Wynn was born, but this time around Rob will be gone a lot this winter coaching basketball. This also means that my DIY to do list will have to remain just a list until spring comes.  Here are some of the recipes I have literally thrown together and put in the freezer so far.  I'm looking forward to trying when the time comes. 

Please go to the direct link below each image to Pin these recipes. Thank you!!

Breakfast is my favorite meal of the day! I was so happy to make these, and hopefully since they can be eaten with one hand that means I'll eat when I am on maternity leave. These are actually pretty healthy too. Rob added Old Bay Seasoning to some of them just to give it a try. According to Rob, Old Bay Seasoning goes with everything!


I doubled this recipe so we could try it the day I made it for the freezer meals. I used ground turkey, and the cooking time was almost cut in half. It was one of maybe two meals I had to cook something before hand since it's not a crock pot meal. But it was definitely worth the effort and the glaze is delicious! 

I also ended up doubling this recipe and having it for dinner last week, and freezing the other half. It turned out great, and the rice was a great alternative to a tortilla or a taco shell for once.

I made five of these recipes as well. I'm excited to try out her sesame chicken recipe. That is one of my favorite dishes to get at a restaurant.

I created five meals from this list in a half an hour! I thought that it was super quick, and I'm excited to try some of these recipes out.  I really like that they involve the slow cooker too.

This is a really easy chicken parmesan recipe to put in your freezer meal stash.  These ladies also provide a lot of helpful tips and a ton of recipes on this page of their blog: Healthy Freezer Meals by Thriving Home Blog

Do you have a favorite freezer meal idea? I'd love to hear about it. I'm ready to add a few more to the little space I have left in my two freezers.


Tuesday, September 10, 2013

Spider Halloween Wreath

I've been pinning a lot of wreath ideas on Pinterest lately. I had never made a Halloween wreath before, and thought I'd give it a whirl this year.  I used the following materials for this wreath in particular:

  • a straw wreath from Hobby Lobby
  • leftover ivory burlap from my stash
  • chevron burlap from Hobby Lobby
  • a glitter spider from Michaels
  • a piece of cardboard
  • chalkboard vinyl from Michaels
  • chalk

I wrapped the straw wreath form first in the ivory colored burlap. I wanted to originally wrap it only in the the chevron burlap, but I realized that I would use the entire roll up with one wreath. I wanted to have the option to use the chevron for other projects.  Then I wrapped the wreath every inch or so with the chevron burlap strips.
I cut apart one of my many Amazon boxes, and then wrapped that in chalkboard adhesive vinyl. I attached the cardboard/vinyl piece with some hot glue to the back of the wreath.
Finally I added a little spider with a clothespin attached to it onto the wreath. I was glad I didn't have to glue it. I think I will be able to make this wreath work for another holiday down the road by taking off the spider and erasing the center . Then I draw a quick web with some chalk to make it even more ready for Halloween.
Thank you so much for stopping by today!

Monday, September 9, 2013

Ghost Bucket Halloween Treat

I realize that it is only the beginning of September, but knowing that I will be out of commission around Halloween time makes me want to get some projects done now.  I picked up some super cute Happy Halloween buckets in the Target Dollar Spot last year on clearance for a quarter each. 
I made made these super easy ghost buckets with Wynn for her two preschool teachers. We placed a Styrofoam ball wrapped in chevron burlap in the bucket. Then we wrapped two Tootsie Pops with napkins and tied it with some straw. Wynn helped me to draw two eyes on each ghost, and then we stuck them through the burlap and into the Styrofoam.
Now I'm wishing that I had snagged a couple more of these buckets last year. They could be used to make all sorts of things for Halloween.  These cost probably around $.75 to make for each teacher. Target always seems to have some sort of buckets in their Dollar Spot though.  Thanks so much for stopping by! 

Sunday, September 8, 2013

Gift for Labor & Delivery Nurses

 In a few weeks I will be in the capable hands of some amazing medical professionals. I remembered the first time around how much I appreciated the hard work of the labor and delivery nurses that I encountered.  This time I am going to be coming in prepared with some goodies for them as a token of my appreciation.
I was able to put four bags together for less than $5 a piece. The bags were a great deal at Michaels for just a dime.  Then I got the manicure/pedicure kits in the Michaels dollar section which is 60% off right now for 80 cents a piece.  I added some nail polish from Target that was around $4. 

This gift would certainly work for any occasion.  I have already packed these in my hospital bag, so I know not to forget them.  Thanks so much for stopping by! 

Wednesday, September 4, 2013

First Day of Preschool

My sweet Wynn had her very first day of preschool yesterday morning. For her picture before we headed off I used a chalkboard circle and a chalkboard marker to commemorate the day. It was super easy, and I know I'll be using it at on the last day of school as well. I think it will be neat to see her grow over the year.


Here favorite part of the day was snack time.  Apparently that must been one amazing snack because I know another kiddo that said the same thing. 

Hope everyone had a great first day back to school whenever it happened. Enjoy your day!


Monday, September 2, 2013

Nursery is Complete


Well this weekend I got the day bed pulled together in the nursery. This was the final to do on my list for this room. I hung the artwork that I ordered from Etsy Shops Slightly Sprightly and Dalloway Place.  That turned out to be the perfect spot for it after all.  Then I added some king size pillows, pillows from our previous guest bed and then two 18 x 18 pillows with covers from The Pillow People Etsy Shop. I really love the new pillows in the dark navy.


 Here is another view of it from the bottom of the bed and up. I found that the large wipes boxes from Pampers fit perfectly in those little storage areas below. I plan on wrapping some empty ones in fabric once I got through some of them. I have a feeling I will be able to do that pretty quickly in a few months.
Hope you had a wonderful weekend! Thank you for stopping by!

Here are some other views if you haven't checked them out yet...