Sunday, January 22, 2012

Door knobs, Hinges, & Vents Galore!!

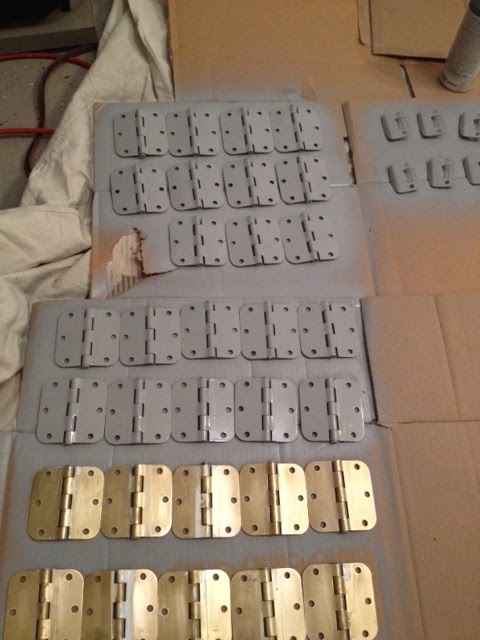
Chris and I were sick of those ugly gold brass and silver door knobs. Half of our doors had gold on one side and silver on the other. We decided to spray paint everything one color which was a cheaper alternative than paying up to $ 300 for new hardware.  Plan on dedicating a weekend to this project, two full days this is not quick fix. First we had to remove all the hardware, lightly sand everything with 220 grit just to rough it up a little. No need to go overboard with the sanding but it is a must!!!


Next, we sprayed painted everything with Primer in color gray. Once it was dry, we spray painted everything in oil rubbed bronze. We couldnt be happier with the finished product, its amazing how something so little can make a huge transformation.


Rustoleum Gray Primer $10 (2 cans)
Rustoleum Oil Rubbed Bronze $28 (4 cans)

Total: $38

Chris and Amy


Tuesday, January 17, 2012

Kitchen Cabinet Redo - Beadboard Inserts


We painted our kitchen cabinets a few years ago from our 1980's contractor brown and spray painted our brass handles and knobs to resemble oil rubbed bronze. However, we knew we'd like to update them again.

Here is our kitchen when we moved in...Ugh


Rob began with wall behind the cabinets. He purchased eight foot sheets of beadboard at Home Depot and painted them black. He had to make a few cuts on this side for the electrical outlet and the corner.


The sides of the cabinet were not as easy as they required a double layer of beadboard to match up with the wall section behind it. 

He then took off the doors of all the cabinets. He cut the beadboard to fit inside each of the cabinet faces.  He used wood putty to fill it in.


Rob then had to do a lot of work to match up our new bin pulls rather than the knobs that were previously in place.  He said that it was the most time consuming of all the parts of the project. Rob sprayed painted the old hinges to match the new hardware.


The after pictures...


Hope you enjoyed our transformation.  We will be leaving the upper cabinets open without doors. We plan on wallpapering the back of them and painting the inside as well. I'll post those pictures once we complete that part of the project.

Paint Lowes - $35
Beadboard - $100
Trim - $25
Hardware - $25

Total $185

Rob and Megan

Monday, January 16, 2012

China Cabinet Project - With Lace Features

We bought a china cabinet off Craigslist  to restore to our liking. This was a cheaper alternative than spending hundreds of dollars on a store bought cabinet. All you need is lots of free time and imagination, this was the hardest DIY I've done so far but I was able to create a one of a kind china cabinet in my style.
Lace effect: this part I was most excited to try! All you need is lace and spray paint color of your choice. Lay the lace over the cabinets, make sure it's folded over tightly and spray!


China cabinet- $100
Paint- home depot (raffia cream) $30
Black spray paint $3 (with a coupon)
Lace- Joann fabrics $5 ( with coupon)
Black knobs- hobby lobby $12
Silver knobs- lowes $15

Total: $165


Chris & Amy

Linking Up To:
A Glimpse Inside

Sunday, January 8, 2012

Starburst Mirror

I wanted to re create the famous starburst mirror which can go for up to a few hundred bucks. All you need is a small mirror size of your choice, skewers, mirror hook, spray paint and of course my best friend the hot glue gun!

For two starburst mirrors:
Small- Dollar Store $1
Medium- Michaels $4
Variety of mirror sizes - Michaels $3
 Skewers - already had at home but can be bought anywhere for about $2
Spray paint- already had from other projects

Total: $8 makes two!


Chris & Amy

Pantry Makeover

Our pantry was plain, boring and well unorganized. I could never find anything and half the time I would come back from the grocery store with an item I already had in my pantry but didn't know! So I came up with a plan to get organized.


First I painted the side walls white. I love the tin backsplash but can't afford it so I put my thinking cap on and came up with an alternative. I bought white wallpaper with a pattern and spray painted it. Then I laid cork board shelf liner over the racks so my food could stand straight instead of always falling lol.


I took baskets that were it in closets and grouped my food products together.


Finally, I bought chalkboard labels and stuck them to the basket so I could quickly look in my pantry and find what I needed.


Hope this helps thanks for reading.


Wallpaper ( clearance at lowes) $6
Valspar metal spray paint $ 7
Cork board shelf liner ( I needed two rolls, I found target has the cheapest $9 lowes $13)
Chalkboard labels ( amazon $9)

Total: $44


Chris & Amy

Linking Up To:
A Glimpse Inside

Wednesday, January 4, 2012

Craft Project: Ribbon Strip Garland

I wanted to create this ribbon garland that I saw on the website Catch My Party.  http://catchmyparty.com/photos/277419


I went to Jo-Ann Fabrics and they were having a 30% off sale. I was able to get a total of 2.5 yards of fabric for 12 dollars approximately.  I actually got a half yard of five different prints.

I then cut the fabric into 2 inch strips the length of each half yard.  I then used yarn I already had to attach the strips to simply by knotting the fabric in the middle.  Here is the finished product...


Very simple and easy to do. This will be a decoration at a baby shower...maybe part of the backdrop for the table with the food or drinks.

Thanks!

Megan

China Cabinet Update

We took a Craiglist find china cabinet that was 50 years old and with a lot of sanding, painting and sanding again Rob was able to achieve a Pottery Barn like finish.  :)


We spent approximately the following:

Paint  - $20
Sand paper materials -  $20
Handles and Knobs   -  $25
Fabric from Jo-Ann's - $15
China Cabinet - $100

Total Cost of Project - $180
Hours of Labor - Priceless  :)

Thanks for checking out our project. We are so excited about the end result.

Rob and Megan

Upholstered Headboard

Okay, well Rob and I were interested in having an upholstered headboard. I did the typical furniture search online...and realized the one that I mostly wanted was way over any budget that I had in mind. Here is where the inspiration came from...the Restoration Hardware Wallace Upholstered Bed...a mere $1990 plus shipping. Um....that wasn't going to fly.
So we decided to look into findnig a project ideas on pinterest. I found this great tutorial for making a headboard on an awesome blog called Max and Isabella Rooms. Here is the link to their beautiful project. 

Here are the steps that we took. We first went to Jo-Anne fabrics. We were able to spend approximately $28.00 on fabric (2.5 yards)  Rob went back the next day to purchase the foam needed for the project. The next day the salesperson said it would be 50% off and we had a 10% off coupon. Therefore, the delay was 100% necessary. Rob went back and spent around $70.00 on the foam which was also about 2.5 yards.

We obtained our hammered nickel tacks from both Jo-Ann and Lowe's. I think Rob bought all the boxes he could find. We could have gotten the tacks in strips, but we were too excited to start the project and didn't want to wait for an online order to get shipped to us.


Thanks for reading!

Rob & Megan

Coffee Table Update


Once again Chris and I had an old piece of furniture that was in our basement. My parents gave us their coffee table when we first moved in together but after we bought our house I wasnt fond of using it. It wasnt our style. I had an idea to find some use out of it. I sanded it with 60 grit sand paper followed by 220 grit. I had to put two coats of paint, after it dried I took 220 grit and sanded in again. I bought a yard fabric from joann fabric (i only needed a half a yard but im sure i can find some use with the extra fabric:) I flipped the table over a hot glued fabric so it would show underneath the glass. I bought distressed ink from Michaels to give it a distressed shabby chic look. Finally I srayed polyurethane to give it a shiny gloss look.

Coffe table-Free
Paint-I only used 2 paint samples from home depot ( color-Raffia Cream) $5
Fabric- Joann Fabric $20
Distressed Ink- Michaels $5
Polyurethane Spray- Home Depot $7

Total: $37

Chris & Amy


Shared On 

A Glimpse Inside

Our New Rug

Chris and I had a few old rugs laying around in the basement collecting dust. I wanted to put them to good use so I decided to paint the rug and use a stencil. I flipped the rug over to used bottom part of the rug. You need the rug to be hard and flat. Make sure to sand the rug it will give it a softer feel. After I painted two coats of paint we already had in the basement I placed a stencil and lightly rolled white paint. I splurged and bought a nice stencil since the rest of the project was free! So for about 40 bucks I re created and old rug into one that we could use in our living room!
Rug-free
Paint-free
Stencil from cutting edge design-$40


Amy & Chris


Monday, January 2, 2012

Simple Chair Redo

My mom gave me her chair from when she was a little girl to redo for Wynn's birthday. I'm doing a polka dot theme for the party, so hence the fabric choice. First I took the chair and sanded it down. Then I painted it with leftover paint from a previous project in Olympic's Decorator White. Next, Rob used foam that was leftover from our headboard project to secure to the chair. I had gotten a few yards of polka dot fabric from Jo-Ann Fabrics to use for the party. The entire project cost approximately 3 dollars for the fabric. I had used materials from other projects, so I'm excited that it was really inexpensive to complete. Check out the photos.


Megan

Sunday, January 1, 2012

Coffee Table Repurpose

We needed a media stand for our new TV. However, we did not want to spend a fortune on one or get a cheap one. I guess we didn't like either option.  We already had purchased a coffee table from Pier One several years ago that was on clearance because it was missing a few screws (found that out today)  Rob thought it would bes a great idea to take the coffee table make it sturdy and cut off a piece of it to make it an instant TV stand. We could then search for a coffee table on Craigslist to work on later.

Here is are Pier One Coffee Table

 Rob took it apart and made the cuts with his table saw.
Once all the cuts have been made he reassembles the table that has been basically lost a third of the total size of it before.


Now it's the perfect size for our TV stand. Please excuse our cords...we are working on that.  :)