Showing posts with label Wall Decor. Show all posts

Wednesday, November 11, 2015

Hand Print Art

I saw this adorable project by Creatively Living Blog when I was perusing Pinterest early one morning with the baby.  I immediately began the search for a long and narrow frame in a gray color.  I found a frame at Kohls for around $10. It was the perfect size for this project.  This would also make a great holiday gift as well.


I mixed up some black and white finger paint to get a dark gray, and painted all of the kids hands when they woke up from their naps. Have some baby wipes nearby because they make for easy clean up. Then I simply wrote their names with a Sharpie, and put them in order from youngest to oldest. Such a simple project, and I absolutely adore how tiny the baby's hand is in this project.

Now it is hanging up right next to the newly painted fireplace.  Thanks for stopping by!


Monday, March 3, 2014

Burlap Monogram Sign

I could not just make one burlap monogram present apparently. I made this one for my mother in law. I figure everyone could use something bright in their home during all these dreary winter days we have been experiencing lately. Is it spring yet?  


I picked up the burlap canvas at Michaels and a large pad of scrapbook paper on clearance. I already had the wooden V in my collection. I painted the letter with a mixture of gold and pink paint.  I used spray adhesive to attach the scrapbook paper to the canvas, and then hot glue to attach the wooden letter.

I think I may have to go and get another canvas to make one for myself. Thanks so much for stopping by today.


Monday, February 17, 2014

Land of Nod Inspired Kids Artwork

I saw some adorable wall decor in the Land of Nod catalog a few weeks ago. I wanted to fill a small space in the nursery, and decided to make my own version inspired by the $25 a piece framed wall decor from Land of Nod.


I was at first going to purchase square frames, but decided in the end that it was not cost effective. The frames that the LON has are 10 X 10, and I ended up purchasing 6 X 6 canvases. The reason I chose that size was that I found the some scrapbook paper I wanted to use in that dimension.


I purchased the canvases through a seller on Amazon. The only reason I did this was because I knew I could get them easier this way. I had no idea if there would be a Michaels trip in my near future and I did not want to wait.  I simply mod podged the scrapbook paper to the canvas. Then I cut out some animal shapes I had purchased for my Silhouette Cameo machine. The entire project took about twenty minutes of work and some drying time in between.

Here are the inspiration photos from Land of Nod's site.


I am very happy with how they turned out. It cost approximately $8 dollars for me to make four of them. Instead of the $100 it would have cost to buy four of these from Land of Nod.
Thanks so much for stopping by! 


Friday, May 3, 2013

Pottery Barn Kids Knock Off Mermaid Sign

I really got inspired when I received the most recent Pottery Barn Kids magazine. There are some things that I do end up buying from there (usually on sale), but I do like to create some of the adorable kids decorations or items that they have to offer. I made this mermaid sign for Wynn's room with a wooden plaque from Michaels, some white vinyl adhesive, turquoise paint from a previous project and my Silhoutte machine. 
 
I painted over the plaque that was around $6 if I can remember correctly.  I went through the images I had previously purchased through Silhouette and picked out an arrow and starfish for the sign. I typed up the wording and cut everything out on a pretty small piece of vinyl, and there was not a lot of waste.  The plaque is approximately 12 inches by 6 inches.


Here is the piece from PBK that runs about $29 plus s/h.  I like how their sign has individual boards glued together, but I was in a time crunch and I already had the wooden plaque in my basement.  That way I did not have to purchase something new.
 
My version was around $8 dollars compared to the $29.  I am hoping to put this is in Wynn's room as I change up the decor in there a little bit.  Hope you have a wonderful weekend.


Tuesday, April 23, 2013

Thumbtack Anchor

The nautical bridal shower that I'm planning with my friends is going to have a navy and pink color scheme.  I was eager to come up with some decorations for the party.  I headed to my craft stash, and pulled out some thumbtacks and a 12 by 12 canvas.  The thumbtacks are from the Dollar Tree, which is the best place to buy them cost wise in my opinion. I used one box of tacks for this project.

I arranged the thumbtacks in an anchor shape.  Then I used some blue and pink paint to create some stripes along the sides to match the shower color scheme by taping it out with Frog Tape.  I just eyeballed the measurements of the stripes as I went.  


I'm excited to make a few more projects for this shower. It's going to be so beautiful because the friends that are working on it always are so creative.  Thanks for checking this project idea out.

Wednesday, April 17, 2013

Bridal Shower Gift Idea

Another project done using my Silhouette machine and another gift idea. My college roommate is getting married in a few months. This was one of the first projects I tried using my machine. I had a 12 by 12 sheet of brown vinyl and made the largest starfish I could.  I painted a 12 by 12 canvas with some blue paint I had.  Our bridesmaid dressers are turquoise so I figured I could not go wrong with this color.


I folded the starfish over the edges of the canvas to make it look a little more interesting instead of it just centered on the canvas. Thanks so much for stopping by!

Monday, April 15, 2013

Gift Bag Wall Decor


 I've decided to change up Wynn's room a little bit.  She just turned three and she keeps asking for a big girl room. Whatever that means to a three year old. :)  I am going to attempt to incorporate the colors of aqua and coral in her room.  After I made that decision I found the cutest gift bag at Target last week.  I decided to make some simple wall art with it.  The bag was a few dollars.  Then I found a great deal on a 11" by 14" frame at Home Goods for about $10.


I simply used one side of the bag and placed it in the frame. I left the ribbon in place so there were no holes in the bag showing. I am hoping to incorporate this into some sort of gallery wall in her room. I think I'm going to be on the look out for some larger gift bags to use for future projects. 

Thanks for stopping by!

Wednesday, April 10, 2013

Easy Moroccan Inspired Wall Art

I had recently purchased some contact paper at Marshalls. I did not really have a plan for it but I figured that I could do something with it eventually.I decided that it would look good on a canvas with an image I had downloaded from the Silhouette online store. 
I simply wrapped the canvas in the contact paper and then added the vinyl adhesive to it.  I plan on using this as part of a gift for a friend who likes this style.


The two rolls of contact paper was about $5 and the canvas was leftover from a previous project.  I have also gotten the same contact paper in turquoise as well from Marshalls. They always seem to have fun designs there to choose from.

Thanks for stopping by!

Tuesday, February 19, 2013

Wednesday, October 17, 2012

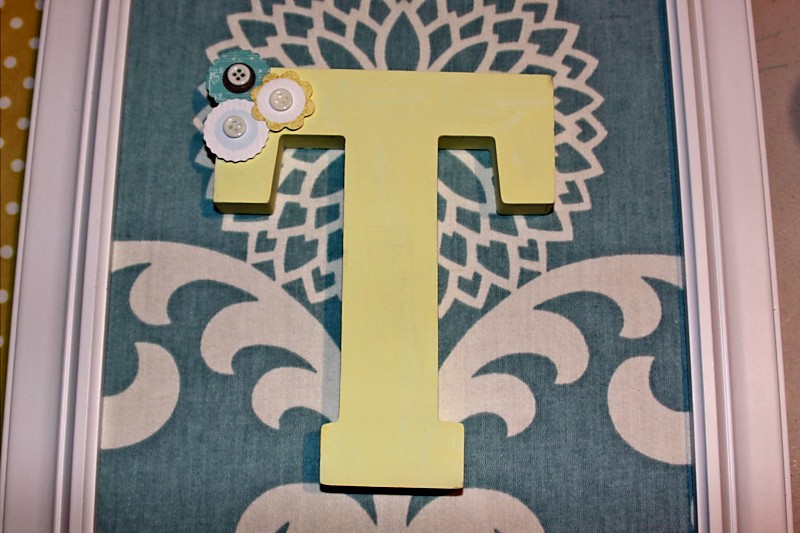
Easy Monogram Project

I was trying to think of a gift idea this weekend and wanted to use only materials from my craft stash. I've been trying to avoid buying anything new lately because I feel like I have enough materials on hand. This is all do the Project Overhauling challenge I participated in.
October Overhauling
I had some leftover fabric from my lampshade recover project, and then my project started from there.  I took a frame that I had not used before and covered the cardboard piece included with it with fabric. I took out the glass from the frame because it is not needed.

I glued the fabric onto the cardboard and then placed it inside the frame.  Next I painted a wooden letter that I had gotten on clearance a few weeks ago. I had hoped that I could find a way to make something for a friend with it.  I painted it with leftover paint that I had, and added some flower stickers onto one of the corners.

Then I glued the letter to the fabric background on the frame.  Because I used materials I had already purchased for other projects the only new purchase was the letter, which was on clearance for $2.00.  I hope that my friend will like her gift.

Thanks so much for stopping by! Don't forget to follow me on Pinterest if you would like. The button is on the right hand side of our blog.

Have a great day.

Megan


Monday
Alderberry Hill
Etcetorize
The Gunny Sack
The Dedicated House
Adventures of a DIY Mom 
Home Stories A to Z
Tip Junkie

Tuesday
A Diamond in the Stuff
Elizabeth & Co
Romance on a Dime
The NY Melrose Family
The DIY Dreamer
Claiming Our Space
The Winthrop Chronicles
Full Circle Creations
Pincushion Creations

Wednesday
Polkadots on Parade
Southern Lovely
We Like To Learn As We Go
The Shabby Creek Cottage
Someday Crafts
High Heels & Grills
Mom on Timeout

Thursday
The Taylor House
At The Picket Fence
Live Laugh Rowe
A Glimpse Inside
Seven Alive
52 Mantles
Fireflies and Jellybeans
Bloom Designs
House of Hepworths
Momnivores Dilemma
Western Warmth

Friday
504 Main
Redoux Interiors
Craftionary
The Grant Life
Just Us Four
Thrifty Handmade Days
Tatertots & Jello
Fresh Eggs Daily

Saturday
Too Much Time On My Hands
Tutus and Tea Parties
Classy Clutter
Its Overflowing

Sunday
Nifty Thrifty Things
Flamingo Toes
Twigg Studios
C.R.A.F.T.
My 1929 Charmer
Brassy Apple 
Impatiently Crafty

Sunday, August 26, 2012

Wall Decor Using Paper by Amy & Chris

I completed this project way before our family talked about having a blog but I thought I'd share now. This project is easy, fun, inexpensive and a great way to add wall art to an emtpy space. I had an empty wall in my dining room that was screaming for wall art. One day Chris and I walked into Papersource and I instantly was thinking how I could use paper for a project. I chose a few different sheets of decorative paper and frames that were on sale at Michaels.

Next comes the fun and creative part: I used different sheets of paper and made my own design.
 I bought a small canvas and wrapped the paper around this one.
 I used ribbon for this one to create a border around the smaller square.


Thanks for stopping by!

Amy & Chris

We enjoy linking up to:


Monday
Alderberry Hill
Etcetorize
The Gunny Sack
The Dedicated House
Adventures of a DIY Mom 
Home Stories A to Z

Tuesday
A Diamond in the Stuff
Elizabeth & Co
Romance on a Dime
The NY Melrose Family
Simply Done Wright
The DIY Dreamer
Claiming Our Space
The Winthrop Chronicles
The Kurtz Corner

Wednesday
Polkadots on Parade
Southern Lovely
We Like To Learn As We Go
The Shabby Creek Cottage
Someday Crafts
Simply Done Wright

Thursday
The Taylor House
At The Picket Fence
Live Laugh Rowe
A Glimpse Inside
Seven Alive
52 Mantles
Fireflies and Jellybeans
Bloom Designs
House of Hepworths
Momnivores Dilemma
Two Sasters

Friday
504 Main
Redoux Interiors
Raising Oranges
Craftionary
The Grant Life
Just Us Four
Thrifty Handmade Days
Tatertots & Jello

Saturday
Too Much Time On My Hands
Tutus and Tea Parties
Classy Clutter
Its Overflowing

Sunday
Nifty Thrifty Things
Flamingo Toes
Twigg Studios
C.R.A.F.T.
My 1929 Charmer
Brassy Apple

Saturday, August 25, 2012

Knock Off Project from Ballard Designs

Whenever the Ballard Designs catalog comes in the mail I'm immediately drooling over each page. I fell in love with their Lindsay mirror that retails for $199.


I recreated my own version of this mirror for $14.00 and leftover spray paint from home. I purchased some small wreaths from the Dollar Store at $7 a piece total.  I spray painted them white with some left over spray paint.


Then I went out and about in search of a mirror. Well needless to say the size I needed was around 36 inches and they were around $50.00. Therefore I thought I needed to come up with a new plan. I went to Michael's and bought a 10 inch mirror for approximately $5.00 with a coupon.  But, I knew that wasn't going to cut it.  Then I found this enormous frisbee in the summer clearance section for $1.35. I spray painted it gray with leftover spray paint.
Then I added pieces of paper behind each of the wreaths sprayed in gray spray paint, and then glued them around the frisbee. I knew I couldn't add too much weight to the flimsy frisbee because it was thin and 36 inches across. Which was the perfect size considering the one I wanted to by from BD was 35 inches.

I decided to go ahead and add that small mirror from Michael's to the center.
 I placed it over the bed because it's not heavy at all, so it is not a safety concern for me.  I really like the look of it and I'm glad I tried to recreate it. (even if it is slightly different for cost purposes)

Thanks for stopping by! 

Megan


We enjoy linking up to:


Monday
Alderberry Hill
Etcetorize
The Gunny Sack
The Dedicated House
Adventures of a DIY Mom 
Home Stories A to Z

Tuesday
A Diamond in the Stuff
Elizabeth & Co
Romance on a Dime
The NY Melrose Family
Simply Done Wright
The DIY Dreamer
Claiming Our Space
The Winthrop Chronicles
The Kurtz Corner

Wednesday
Polkadots on Parade
Southern Lovely
We Like To Learn As We Go
The Shabby Creek Cottage
Someday Crafts

Simply Done Wright


Thursday
The Taylor House
At The Picket Fence
Live Laugh Rowe
A Glimpse Inside
Seven Alive
52 Mantles
Fireflies and Jellybeans
Bloom Designs
House of Hepworths
Momnivores Dilemma
Two Sasters

Friday
504 Main
Redoux Interiors
Raising Oranges
Craftionary
The Grant Life
Just Us Four
Thrifty Handmade Days
Tatertots & Jello

Saturday
Too Much Time On My Hands
Tutus and Tea Parties
Classy Clutter
Its Overflowing

Sunday
Nifty Thrifty Things
Flamingo Toes
Twigg Studios
C.R.A.F.T.
My 1929 Charmer
Brassy Apple