Tuesday, June 16, 2015

Fireworks in a Jar

We are on a patriotic theme kids activities kick at our house. This one is super easy to pull off with items you probably already have on hand. This idea was originally shared on I Can Teach My Child

You will need the following:  

Warm Water
Vegetable Oil
Food Coloring
Plastic or Glass Clear Container
Bowl 
Fork


Fill your container with warm water approximately three quarters full.  Pour three to four tablespoons of oil into a bowl. Then add several drops of food coloring to the bowl.  Take a fork and gently blend the food coloring and the oil.


Gently pour the food coloring and oil mixture into the warm water. 
As soon as the food coloring and oil mixture hits the warm water it starts to make "fireworks" in the water. We actually tried this several times, and everyone seemed to enjoy it. This was very easy to set up before lunch or dinner time, and it entertained the kids while I put their meals together.  Hooray for pre-meal entertainment that actually does not involve a screen for once.  Thanks so much for stopping by as always!


Monday, June 15, 2015

Golf Ball Firework Art


Fourth of July is just around the corner, and Wynn and I got started on some patriotic crafts for window decorations. The supplies you will need for this craft are:

-paint
-golf balls
-Dollar Tree cake pan or other container
-plastic cup
-plastic fork or spoon
-construction paper

I originally saw this idea on the blog The Realistic Mama and was excited to see something that we could make that would be easy to do and clean up.

We were lucky that a relative gave us about five hundred golf balls that ended up in her yard from golfers missing the course completely. Therefore, we did not have to buy any new balls to use for this project. I'm sure that would be considered a sin.

The first step was that we poured paint into a plastic cup and dropped in the ball. Wynn used a plastic fork to get the ball covered completely. Then I traced the bottom of the cake pan on a piece of construction paper and placed the paper into the pan. Wynn flipped the ball out of the cup and pushed it around the pan.  It was fun to see the pattern that the golf ball made with the paint.

Next we added in some blue paint and she continued the process again.
Wynn was more excited that it was turning out purple in some of the places from the combining of colors.  We did various colors of paper, and then we placed them on the counter to dry for a bit.
Once dry we used scissors to simply cut out the shape of fireworks. We hung them on our french door windows for the 4th. Wynn has already asked to make more, and I am sure we will do a few extra. It was quick and easy and we have all the materials to make them.
Thanks for stopping by!  Hope you and your kiddos try these out too!

Wednesday, June 10, 2015

Patriotic Eraser Stamped Shirt


I had pinned this cute idea from the blog Cutesy Crafts.  I decided that we would make this shirt for a Fourth of July picnic we are going to this summer. I picked up a $4.50 shirt from Target yesterday. It was the perfect price to make a custom shirt.  
You will also need pencils with new erasers (I used some leftover Dollar Tree pencils), fabric paint, freezer paper, shape cut out of any type of paper, and an iron.

Decide on the shape that you would like to use and trace it on the non-shiny side of the freezer paper. Then cut it out and use an iron on medium heat to adhere the freezer paper to the shirt.
Wynn asked for a heart shape. Then I placed a little bit of paint on some parchment paper for her to dip the erasers into. It made for much easier clean up at the end.  Then Wynn would simply stamp on the eraser until it ran out of paint on the end of it. Then she was on a roll stamping the eraser all around the heart shape. Then we did the same thing with the blue paint as well.
We let the paint dry for a few hours and then we simply pulled off the freezer paper very gently.  It came off quite easily.
Here is Wynn in her newly designed shirt.  I think we may have to do this for a few of the holidays coming up. Maybe pumpkins for the pumpkin patch trip or even a Christmas tree in the winter.  Maybe even a number shirt for a birthday celebration.  For more ideas check out the Cutesy Crafts Blog.  Thanks so much for stopping by!

Tuesday, June 9, 2015

Chalkboard and Art Display for Playroom


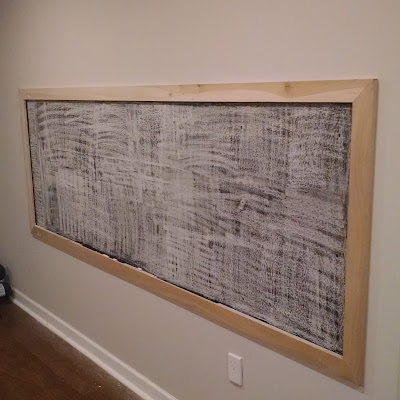
I knew we had to incorporate a chalkboard in the playroom. Rob used some pine wood to build a frame for it. We used leftover paint from our master bedroom accent wall to paint the wood. That color is Sherwin Williams Anonymous Gray.  One of my favorites, and it looks great with the gray we already had on the walls.


We used the Valspar Chalkboard paint in one quart from Lowes. The chalkboard required three coats, and it barely made a dent in the total quart. The can is still at least 70% full after painting an eight foot long chalkboard. The height of the board is approximately 2.5 feet.


After the chalkboard paint was dry, I followed the directions on this blog to ensure that I "seasoned the chalkboard" correctly. 
Wynn had me divide the areas up with the names at the top. She assured me that everyone will remain in their designated area. Rob used a router to notch out some sections at the botom of the chalkboard for the chalk and eraser to stay.

I purchased the Ikea Dignitet Curtain Wire and had it shipped to our house. It was around $25 with shipping, and it was less expensive then driving to Ikea and paying for gas. It came within in a week. Rob cut the wire the approximate length of the chalkboard and hung it up in around ten minutes. It took a little time because he did this with all the kiddos running around. It is a great system to have for displaying art work. I purchased the Riktig Curtain Hooks for $2.99 from Ikea as well to have something to hang up the artwork with.

Things are coming together and we are enjoying this much needed extra space a lot these days. It is a nice cool refuge on the warmer days of spring that is for sure.