Friday, November 30, 2012

Built In Cabinets and Shelving in Progress


Our family room has a lot of unused space for us at the moment.  We have been in our home for four years, and this wall has pretty much sat there. We framed some sports moments and left it like that. With the the exception of painting it in Valspar's Leather Satchel everything remained the same.


 Then one day in September Rob build this and said I'm going to build some built ins and shelving.  I was excited that he was going to do something with this unused space and give us toy storage which we badly need with a princess loving almost three year old. 
Rob constructed the cabinets using the Kreg system, and then bought the doors from Second Chance a restore in Baltimore City for around one hundred dollars for all seven doors we needed.
 We purchased premade counters from Lowe's and stained them.  Here is the other side of the built ins.
 We had an electrician come out and move our outlets up and add an outlet for our television.
Rob then began construction on the shelving above the cabinets. Our foundation sits out a bit from the wall about half way up, and so he used that as the starting point for the first shelf.
 Rob then attached some trim in front of the shelving to make them appear thicker and give them a finished look.
 In between the cabinets Rob used wood paneling to make a wall to attach the T.V.  He used a 2 by 10 behind it to attach the TV mounting piece to later on.  He then gave it a fresh coat of white paint.


 Here we are so far with the trim left to do and of course starting to fill up those shelves. Everything is haphazard for now. But, we (as in Rob) hopes to finish it up by tomorrow.  Then in a few weeks we are going to add a built in bench underneath the TV.
Thanks for checking it out so far. We hope to make some more progress in the next day.

Megan

Sharing at:


Monday
Alderberry Hill
The Gunny Sack
The Dedicated House
Adventures of a DIY Mom 
Home Stories A to Z
Todays Creative

Tuesday
Uncommon Designs
A Diamond in the Stuff
Elizabeth & Co
Romance on a Dime
The NY Melrose Family
The DIY Dreamer
Claiming Our Space
The Winthrop Chronicles
Full Circle Creations

Wednesday
Southern Lovely
We Like To Learn As We Go
The Shabby Creek Cottage
Someday Crafts
High Heels & Grills

Thursday
The Taylor House
At The Picket Fence
Live Laugh Rowe
A Glimpse Inside
Seven Alive
52 Mantles
Fireflies and Jellybeans
Bloom Designs
House of Hepworths
Momnivores Dilemma
Western Warmth
Saving 4 Six

Friday
One Project Closer
504 Main
Redoux Interiors
Craftionary
The Grant Life
Just Us Four
Thrifty Handmade Days
Tatertots & Jello
Fresh Eggs Daily

Saturday
Too Much Time On My Hands
Tutus and Tea Parties
Classy Clutter
Its Overflowing

Sunday
Nifty Thrifty Things
Flamingo Toes
Twigg Studios
C.R.A.F.T.
My 1929 Charmer
Brassy Apple 

Holiday Mantel

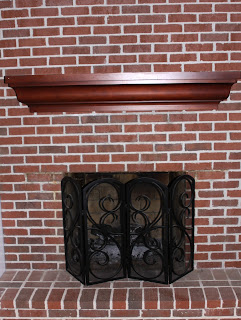
I always tend to leave my poor fireplace pretty empty. We do not spend a ton of time near it and it is truly the after thought. This year though I've been trying to decorate it more than usual.  
Here is my poor fireplace before, which I've been trying to get Rob to agree to painting for quite some time.  What color would you paint it? I'm thinking of having him redo the mantle as well. My project list keeps growing each week.
I first added my taller trees on either end that I purchased from Marshall's last year. Then I made a small tree with white wire ribbon. I then finished that side up with my great holiday find wine bottle from the Elizabeth & Co Tag Sale.
I made this little sign with a leftover frame, scrapbook paper and an ornament from Jo-ann's. Then hung it from the top of my fireplace.

Thanks so much for stopping by!

Megan

Sharing at:

Monday
Alderberry Hill
The Gunny Sack
The Dedicated House
Adventures of a DIY Mom 
Home Stories A to Z
Todays Creative

Tuesday
Uncommon Designs
A Diamond in the Stuff
Elizabeth & Co
Romance on a Dime
The NY Melrose Family
The DIY Dreamer
Claiming Our Space
The Winthrop Chronicles
Full Circle Creations

Wednesday
Southern Lovely
We Like To Learn As We Go
The Shabby Creek Cottage
Someday Crafts
High Heels & Grills

Thursday
The Taylor House
At The Picket Fence
Live Laugh Rowe
A Glimpse Inside
Seven Alive
52 Mantles
Fireflies and Jellybeans
Bloom Designs
House of Hepworths
Momnivores Dilemma
Western Warmth
Saving 4 Six

Friday
One Project Closer
504 Main
Redoux Interiors
Craftionary
The Grant Life
Just Us Four
Thrifty Handmade Days
Tatertots & Jello
Fresh Eggs Daily

Saturday
Too Much Time On My Hands
Tutus and Tea Parties
Classy Clutter
Its Overflowing

Sunday
Nifty Thrifty Things
Flamingo Toes
Twigg Studios
C.R.A.F.T.
My 1929 Charmer
Brassy Apple 


Wednesday, November 28, 2012

Jello "Sand" Art

We were challenged this month at the random acts of craftiness at His & Hers blog to use an item from a grocery store, which has a link up party in January for sharing these projects.  I wanted to have quick and easy craft because this month has been quite busy. I also wanted to make something along with my toddler.  I picked up this container at Target and then purchased some jello. 


Wynn and I created sand art using the jello to display in her room. We are slowly but surely adding items to the top of her bookshelf. Wynn really loves to have this rainbow in her room. The total cost was around seven dollars because the Jello was on sale at two for a dollar.  

I am looking forward to adding some more homemade projects to her room as she continues to grow.  Thank you for stopping by!

Megan


Monday
Alderberry Hill
The Gunny Sack
The Dedicated House
Adventures of a DIY Mom 
Home Stories A to Z
Todays Creative

Tuesday
Uncommon Designs
A Diamond in the Stuff
Elizabeth & Co
Romance on a Dime
The NY Melrose Family
The DIY Dreamer
Claiming Our Space
The Winthrop Chronicles
Full Circle Creations

Wednesday
Southern Lovely
We Like To Learn As We Go
The Shabby Creek Cottage
Someday Crafts
High Heels & Grills

Thursday
The Taylor House
At The Picket Fence
Live Laugh Rowe
A Glimpse Inside
Seven Alive
52 Mantles
Fireflies and Jellybeans
Bloom Designs
House of Hepworths
Momnivores Dilemma
Western Warmth
Saving 4 Six

Friday
One Project Closer
504 Main
Redoux Interiors
Craftionary
The Grant Life
Just Us Four
Thrifty Handmade Days
Tatertots & Jello
Fresh Eggs Daily

Saturday
Too Much Time On My Hands
Tutus and Tea Parties
Classy Clutter
Its Overflowing

Sunday
Nifty Thrifty Things
Flamingo Toes
Twigg Studios
C.R.A.F.T.
My 1929 Charmer
Brassy Apple 

Monday, November 26, 2012

Paper Straw Snowflakes

I still have a large stash of gray paper straws from a baby shower that I helped to host.  I made some "snowflakes" out them to hang in front of my china cabinet. I just added some scrapbook paper circles with glitter adhered to them to attach the straws together.


I added them to the china cabinet along with some other decorations that I already had from last year.  I made a little banner out of doilies with some sticker letters to spell out JOY across the front of the cabinet as well.  Lots of inexpensive projects with some previously purchased decorations made this a budget friendly set up for me.


I hope you had a wonderful Thanksgiving and are looking forward to the upcoming holidays.

Thanks for stopping by!

Megan


Linking up to...


Monday
Alderberry Hill
The Gunny Sack
The Dedicated House
Adventures of a DIY Mom 
Home Stories A to Z
Todays Creative

Tuesday
Uncommon Designs
A Diamond in the Stuff
Elizabeth & Co
Romance on a Dime
The NY Melrose Family
The DIY Dreamer
Claiming Our Space
The Winthrop Chronicles
Full Circle Creations

Wednesday
Southern Lovely
We Like To Learn As We Go
The Shabby Creek Cottage
Someday Crafts
High Heels & Grills

Thursday
The Taylor House
At The Picket Fence
Live Laugh Rowe
A Glimpse Inside
Seven Alive
52 Mantles
Fireflies and Jellybeans
Bloom Designs
House of Hepworths
Momnivores Dilemma
Western Warmth
Saving 4 Six

Friday
One Project Closer
504 Main
Redoux Interiors
Craftionary
The Grant Life
Just Us Four
Thrifty Handmade Days
Tatertots & Jello
Fresh Eggs Daily

Saturday
Too Much Time On My Hands
Tutus and Tea Parties
Classy Clutter
Its Overflowing

Sunday
Nifty Thrifty Things
Flamingo Toes
Twigg Studios
C.R.A.F.T.
My 1929 Charmer
Brassy Apple 


Saturday, November 24, 2012

Personalized Holiday Gift by Amy

I wanted to make something personalized and different for my mom and aunt as a Christmas gift this year. I went to Hobby Lobby (my new addiction) for inspiration and found these items.
I started by transferring the letteres to the jars and then hot gluing the jars to the candle sticks.
I also picked up two wooden knobs I spray painted black and then added ribbon.

I plan to add either candy or small ornament balls inside. I love how it turned out and you can add different decor inside the jar for different holidays.I bought the candle sticks on sale: the total project was under $30.

Thanks for stopping by

Amy!


Monday
Alderberry Hill
The Gunny Sack
The Dedicated House
Adventures of a DIY Mom 
Home Stories A to Z
Todays Creative

Tuesday
Uncommon Designs
A Diamond in the Stuff
Elizabeth & Co
Romance on a Dime
The NY Melrose Family
The DIY Dreamer
Claiming Our Space
The Winthrop Chronicles
Full Circle Creations

Wednesday
Southern Lovely
We Like To Learn As We Go
The Shabby Creek Cottage
Someday Crafts
High Heels & Grills

Thursday
The Taylor House
At The Picket Fence
Live Laugh Rowe
A Glimpse Inside
Seven Alive
52 Mantles
Fireflies and Jellybeans
Bloom Designs
House of Hepworths
Momnivores Dilemma
Western Warmth
Saving 4 Six

Friday
One Project Closer
504 Main
Redoux Interiors
Craftionary
The Grant Life
Just Us Four
Thrifty Handmade Days
Tatertots & Jello
Fresh Eggs Daily

Saturday
Too Much Time On My Hands
Tutus and Tea Parties
Classy Clutter
Its Overflowing

Sunday
Nifty Thrifty Things
Flamingo Toes
Twigg Studios
C.R.A.F.T.
My 1929 Charmer
Brassy Apple 
Impatiently Crafty