Wednesday, November 27, 2013

Pottery Barn Inspired Holiday Sign


I found a super cute extra large sign on the Pottery Barn website. I wanted to create a scaled down version to be a part of my Christmas decor this season. I found a leftover piece of wood in our scrap pile that we seem to have accumulating in our basement. I grabbed some tan and red paint and some paint brushes to get working.
I painted the board red, and then cut out some letters on my Silhouette machine. I placed the letters on the wooden board.
Then went over the entire board and letters with the tan paint.
I wanted the sign to appear rustic and older, so I was not concerned with any bleed through under the letters. I was actually hoping for a little bit actually instead of the paint looking perfect.  Then I rubbed some sand paper over the entire piece to make it look a little more distressed.
Here is the sign from PB that inspired my scaled down version for this project.  I really love the size of it, but obviously not the price tag.
\
Thank you so much for stopping by!  

Monday, November 25, 2013

Cupcake Wrapper Coffee Filter Wreath

This is the wreath that just keeps on giving. I have been able to use the main part of the wreath four times now for various seasons. I love it and wanted to incorporate it into my Christmas decorations this year. It really saves on time to use it over and over again, and it is amazing how it comes out differently each time as well.


Here is my original post on how I created the wreath to begin with: Coffee Filter Wreath.


I took off the cupcake wrappers from the Fourth of July version, and added some red and white chevron patterned wrappers to get it into Christmas mode.
I like to keep these wreaths simple. I only added some red snowflake coasters to the wreath, and that way I feel like I will be able to keep it up past the Christmas season as well.
Thanks so much for stopping by!

Sunday, November 24, 2013

Special Day Wedding Gift Idea & Target Wedding Registry


My sister is getting married in the spring, and when I was asked by Target to share ideas on what to purchase for a registry gift I thought it would be a perfect opportunity.  I had not been to Target recently when I was mostly at home due to being so far along with the twins. I was so excited to get back in there, and I was so amazed by all the new products they have in stock. 
Content and/or other value provided by our partner, Target.
I'd love to hear about your favorite wedding gift that you received. I am always looking for new way to give a thoughtful gift to newlyweds. Please feel free to comment below to share your gift idea or even what you have done for someone else on their special day.

Here are some of the great items that I checked out and was considering for a potential gift for my sister and future brother-in-law.  I loved all the natural wood and gold colored items that I saw. 
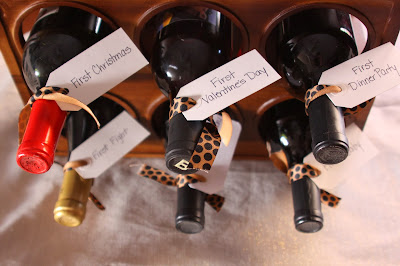
I eventually decided on an acacia wine rack for $24.99 and a set of white wine glasses that were on sale for $20.00 to purchase using the $50 gift card I was provided with by Target. I absolutely love this wine rack. The best part is that they are stackable, so you can buy a couple more to make even more room for the wine in your collection.

 To give the gift a little more special I added tags to the bottles of wine that say the following: First Anniversary, First Christmas, First Valentine's Day, First Dinner Party, First Fight and First Baby. I saw this adorable idea when my friend Emily had her bridal shower a few months back. 


The have many registry gifts that I received when I was married seven years ago that I definitely love.  The KitchenAid Mixer is one of my favorites because I use it to bake cookies and other baked goodies with my favorite girl, Wynn.


It is always nice to have large serving bowls on hand for every day dining and entertaining. I really love this rustic style serving bowl.
A gift that every couple needs is beautiful frames to display their beautiful wedding photography in once they are married. This frame caught my eye because I know it is something that would match the style my sister is going for in her wedding.  You could even frame the invitation for the bride and groom if you wanted to do something special.
I really love this bar cart. I actually got to see it in person during my trip to Target, and it looks beautiful. I think this would be super fun to do as a group gift maybe from the wedding party, and then load it up with bar essentials.
I loved all the simple place settings that they had in the store and online. These could be used for casual and formal entertaining. This type of setting is definitely what I see my friends and family registering for more nowadays instead of fine china.

Thank you so much for stopping by! Do not forget to let me know your favorite wedding gift that you have given or received. I am always looking for new ways to make a present more meaningful for the recipient.  


Thursday, November 21, 2013

Snowman Ornament Kid Craft

I was looking for something fun to do with Wynn for her own Christmas tree. I had purchased some clear ornaments from Michaels, and decided we could create some snowman ornaments together.


We used some tissue paper, cardstock, glue and the ornaments to put them together.  Wynn filled the ornaments with strips of tissue paper. 
I decided to use tissue paper because it does not make a huge mess when you are filling up the ornament. You could use sugar, salt, beads or just about anything white to fill in the ornament. Using tissue paper also allowed Wynn to fill them up almost 100% on her own, and she enjoyed doing it.


We made a couple for her tree, and she really loves them. Now, we just have to get the tree up sometime soon so she can add them herself. This only took about fifteen minutes to complete with a three year old. It was a lot of fun, and was something we could do while the two little boys cat napped.

Thanks for stopping by!

Monday, November 18, 2013

Wooden Advent Calendar by Mellywood's Mansion


Hi Guys,

I'm Mel from Mellywood's Mansion and I'm so excited to be here baby sitting at Our Pinteresting Family today, while Megan and Rob are busy welcoming the twins. As a mother of 5 I think I'm busy, however, I think a 2 for 1 baby arrival would have me beat!

Anyway given that they love all things Pinterest I thought I would make one of my pins a reality. I have seen these wooden advents all over the place and every year I swear I will make one. By the first of December, it goes on the "to do" list for the following year, actually that list should be renamed "the things I pretend I am going to do" list since it seems to grow longer all the time.


So I did go out and buy one of those wooden kits, first thing I will say, the instructions on putting them together aren't great, in fact they're kind of non existent, so try putting it together before painting just to see how it all sits.


Then I painted it in a lovely Christmassy red colour.


Searched Google for some vintage pictures for the main display. I'm not a die hard vintage person but I love vintage style Christmas Cards. Chose a graphic, printed it and stuck it on.


Then I chose a range of different scrapbook papers and stuck them onto the advent boxes and finally ticked wooden advent off that list!


Last year I made this adorable (self praise...very reliable!) bottle cap advent for my daughter, which you can see here.


Or for some Christmas Decor you can see my Santa Boot Centerpiece here


Thanks to Megan and Rob for letting me babysit here today and thanks to all of you for reading. I would love for you guys to come visit me at the Mansion or follow at any of the below places.

Mel xo

I'd Be Delighted If You Followed Mellywood's Mansion!
project-name-for-SEO-purposes-here

Wednesday, November 13, 2013

Monsters Inc Finger Puppet Tutorial by While Wearing Heels

Hello Our Pinteresting Family readers and followers.  I'm Amy, from While Wearing Heels and I am THRILLED to be guest posting here today.

Megan and I share a love for party planning.   I am sure you already know, she has been busy planning Wynn's 4th birthday party, a Monsters, Inc themed party.  Which inspired me to create some Monsters, Inc. finger puppets (which are on their way to Megan right now!).

If you have a Monsters, Inc. fan, keep on reading and learn how to make a set of your own felt finger puppets.


To make your very own Mike Wazowski finger puppet.


Gather the following material:  felt (green, white, black, white), green thread and needle and glue.

Using the pattern below, cut all your felt pieces out.


On the front piece, glue the mouth first, then the teeth and finally the lip (just below the teeth).  Next glue your eye into place, starting with the white, blue and lastly the black (I added a green eyelid).

Grab the back piece and line it up behind the front piece.  Insert the 2 horns between the front and back piece.  Using your needle and thread do a running stitch starting where the left leg meets the body all around to where the right leg meets the body.  Leave the bottom of the body unstitched.  Finally, glue the arms together.


To make your own Sully Finger Puppet...


Gather the following supplies:  felt (2 shades of blue, black, white, gray, purple), blue thread and needle and glue.

Using the pattern below, cut out the felt pieces that make up Sully.


Start by gluing the eyes, nose and mouth to Sully's head.  Cut circles out of purple felt and glue them to both arms and feet.  Glue 3 claws onto each arm and 2 onto each foot.

Grab the back of Sully.  Glue the arms about an inch down from the top.  Place the horns between the head and the back and glue into place, positioning the head over the arms, matching up against the back of Sully.  Using your needle and thread, do a running stitch to secure the front of Sully's body to the back of his body.  I also stitched the feet onto the front of Sully's  body.  Leave the bottom of Sully unstitched.


And, there you have a set of Monsters, Inc. Finger Puppets.


If you liked these finger puppets, you might also like these gnome finger puppets...


or these felt ninja finger puppets...


Or this DIY finger puppet stand tutorial.


Thank you so much, Megan, for letting visit...now when can I come hold those babies!

Monday, November 11, 2013

Fingerprint Pendant Necklace Tutorial from Silo Hill Farm


Hello fans and followers of Our Pinteresting Family!  I'm Danni from Silo Hill Farm blog and I was so excited when Megan asked me to do a guest post for her.  I have no idea how she managed to keep doing projects and posting them right up until her due date, but I'm happy to help her out now! Of course, I wanted to do something baby-ish related, problem is, my babies are grown and gone...but..I'm lucky enough to have a beautiful grandson so I used his little fingerprint to make this layered pendant necklace.
 I searched back on Megans fabulous blog to see just when I started following Our Pinteresting Family.  Turns out, my first comment to Megan was on this post for a fabulous Necklace Organizer that caught my eye.  Coincidence?  I think not!


Don't you love it?  What a perfect way to keep necklaces from getting all tangled up, especially if they have a lot of things dangling from them. 
Although I have a lot of jewelry making supplies, I do not make a lot of jewelry.  I did make a promise to myself that I would try to utilize those tools and supplies more this winter and this is my first attempt.  I have to say that my friend Natalie at NorthShore Days, makes the most fabulous jewelry and does some very good tutorials.  It was this layered necklace that inspired me....
Achieving the Layered Pendant Look
It's a great tutorial and being the novice that I am, I needed it!  
About 3 years ago, I was holding my grandson's hand while we were walking through the woods and the idea for a pendant with his little fingerprint on it popped into my head.  Now because I'm a girl who gets right on it, when we got back into the house, I got out some Fimo clay and made a little ball, flattened it out, pressed his little fingerprint into it, poked a hole in the top, baked it in the oven to harden it and then stuck it in my jewelry box....for THREE years!  Yeah..that's gettin right on it!  So, when I pulled it out last week to make this project, it looked like this...
So precious and tiny. *sigh*.  Also, a little grey and plain.  I got out some primer and spray painted it.
I chose a platinum acrylic paint to give it some color.  Two light coats because I didn't want the paint to fill in the little fingerprint impression so you couldn't see it. 
Then I ran into a problem.  It was really hard to see that little print in the shiny paint.  Hmmm.  Plan B.  I added just a just a little bit of black acrylic to the platinum and used a Q-tip to rub it into the impression ever so lightly.  
Worked perfectly.  Whew!  I gave it a quick shot of clear acrylic spray paint, so I wouldn't knick it up during assembly.
I dug into my jewelry beads, supplies and findings that I've been collecting for a couple of years and chose some things that had special meaning to me.
I played around with this stuff for 2 days trying to get it just right.  For me, the little key was the problem.  I finally figured out how to balance it horizontally by hanging a bead down the left side of it.
After that, the rest was pretty easy!  I chose that blue bead because it reminds me of Jacob's beautiful blue eyes.
Of course, he holds the key to my heart.  There's an awesomeness to little boys with their mixture of mischief, orneriness and sweetness and I'm excited for Megan to have TWO of them!  They grow up so fast and now that Jacob is 6 (and knows everything), I kind of like wearing this necklace and reaching up to feel that little fingerprint from that beautiful day in the woods 3 years ago!


My only other attempt at making jewelry was this bracelet for Valentines Day.
Heart Me Up! Valentines Day Necklace
Thank you for letting me guest post today Megan.  I know you are enjoying those babies and I hope you are getting a little rest!