Showing posts with label kitchen. Show all posts

Wednesday, November 6, 2013

Kitchen Progress & Delay

I'll have to admit the kitchen sort of took a spot on the back burner once we found out were were expecting, and then it basically went out of sight when we found out that we were having twins.  However, Rob has made some progress that I thought I would share because we are basically almost there. 

We ordered some custom cabinets for the smaller cabinets on the ends at Lowes. It took four weeks just to get those two in the store. The middle two were bought off the shelf at Lowes.

We picked out a black fan above the stove so it blends in with the cabinets, instead of matching the stove. The stove was fairly new when we moved in, so we are dealing with the not our favorite color right now.


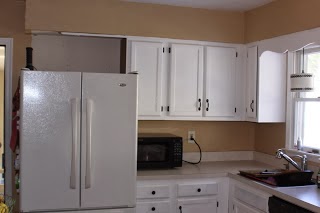
Here is what the same space looked like before we did anything to the kitchen with the soffit in place. That soffit literally concealed just one pipe that were were able to have relocated into the ceiling rafters.  Sorry for the phone picture. I had to do it quickly because Rob was in demo mode.

Remember this is where we started after Rob ripped out some of the cabinets above the refrigerator.  

We are now at a standstill. Not because we do not want to finish this, but because other projects sort of took over. Once we found out in April we were having twins we went straight to work on their room, and finishing the little odds and ends around the house.  The only part we have left in the kitchen now is the back splash, so we are going to wait for spring. We did not have a back splash before so it is not something we necessarily need to have to right now.

Thanks for stopping by! 

Thursday, May 30, 2013

Burlap Baskets for Kitchen Storage

I picked up some great burlap baskets at the tag sale at Elizabeth & Co in Westminster, Maryland. I was not sure what I would use them for when I purchased them. I just knew that when I saw them in Sharon's preview post of the sale that I had to snag some.  I eventually decided to use them to hold Wynn's snacks in the kitchen.


Just to add a little something to them I added some flower embellishments that I found at Michaels. Now they have a little more personality.  It has been helpful having the treats in the baskets instead of boxes. It saves room in the cabinet too.  We got six boxes of fruit snacks and six boxes of granola bars in these two baskets.


Hope you have a great day! Thanks for stopping by.


Tuesday, May 14, 2013

Kitchen Progress

It may seem that our kitchen project is taking a long time, and there are a few reasons why that is true. The first being that we both work full time jobs and secondly we have our sweet Wynn to entertain when we are home. The fact that we didn't really lose any function to it when we tore many of the pieces out means that we do not have to rush. 

He completely built this himself to mimic and inspiration photo I had found.  The bottom right door is where my mixer is being housed. We plan on adding some bin pulls to it to resemble two drawers.  The bottom left may become two drawers, but he is still up in the air with that.

The middle will remain open and an additional shelf will be placed near the top. We thought about making that a cabinet too, but decided against it so that it would not be too dark. There are three shelves in the larger cabinets.

The cost for this section was around $150. There was about $50 spent just on hinges that are hidden inside the cabinets.  Then the pulls were around $30. All other materials wood and paint was around $70. We hope to add molding at the top and put the back splash behind the open shelving.


If you had not seen or had forgotten here was the before of the same space in our kitchen.  It has definitely gotten a lot of love recently. That is for sure.  Thanks for stopping by!


Monday, March 25, 2013

Kitchen Progress

Progress has been made on the kitchen! With weeks of not so nice weather and even several inches of snow falling today we have had some trouble finding time to cut the counters.  On Saturday, Rob was able to get the counters cut because it was a bit warmer and our sink had finally been delivered.


I chose this black granite composite sink for the kitchen. I could not find one in stock at Lowe's or Home Depot, but I found a similar one on Amazon.  Rob was able to get installed with only a few hiccups. It may have taken a while longer than he had anticipated, but he also had to change out some plumbing because our previous sink was significantly smaller.

I picked up the Moen Annabelle faucet in a brushed nickel finish at Lowe's. I had gotten a $10 off coupon recently, so I was able to apply it to this purchase. After choosing the faucet I headed over to the display center to see if they had any granite composite sinks to check out.  I found that the one on display had the exact faucet I chose installed at the display kitchen.  I figured it had to be a good choice then.


Next up determining what to do with our back splash. We are still a little up in the air with that decision.  The cost breakdown for these additions were approximately $750.00. The faucet was $200, the sink was $195 and the counters at Ikea were $350.  We are very happy with all of these choices so far.  Wynn has been enjoying playing in the sink and "washing" dishes.

Thanks for stopping by!


Tuesday, March 5, 2013

Kitchen Progress


This weekend included some kitchen projects. We are moving along and it looks like this will be a longer process than anticipated. Rob was hoping to reuse the drawers on the bottom half of our cabinets and replace the fronts. However, they were attached very well and would not be able to be separated. Therefore Rob had to build six new drawers along with drawer fronts. He also has to build three new cabinet doors to go with this bottom half as well.  We decided to go black on the bottom cabinets and white on the uppers.  Here is how they look so far... and of course please excuse the mess as everything is sort of tossed around lately due to the kitchen being in shambles.

Then we finally agreed on a back splash idea. It is not that we did not agree on anything it was that we were not really in a hunt for anything in particular. We decided on Honey Onyx but we are unsure whether we should do the small or large rectangles.  I bought these samples from Amazon and hope to place an order soon once we figure out what we need. Let me know your thoughts on which size you think we should get.  The larger tile shown is one inch by two inches in size.


I'm headed to Ikea on Friday (cross your fingers snow doesn't get in my way) to order our counter tops for the one side of the kitchen. The other side will have to wait for now. Unless someone wants to sponsor us and give us a quartz counter. I don't think that will happen though.

Thanks for checking us out today!

Monday, February 11, 2013

Drywall and Other Progress

Well with a snow day a week ago Rob was able to finish up the dry wall work where he had taken out the soffit.  We spent about $40 on dry wall, mud and screws.  We also had a friend recommend an electrician who came over after his work day to move some wiring. He was so kind and gave Rob some tips on how to do some wiring himself. He also charged us $40  for the labor and materials. Not a bad deal at all. However, we decided to do something else with the microwave, so we will not have to do any rewiring anyways.

We picked up some maple at Lowe's and had one of the employees cut the wood to build new cabinets.  The total cost for the first wall of cabinet wood was $50.  Here is the inspiration photo that I found on Pinterest and share with Rob when I was thinking of cabinet ideas.


We are going to do this on the side of our kitchen that does not go over our stove. In the middle we are putting our microwave either on the counter in the middle or on a shelf. Rob spent most of Sunday afternoon building the two sides of the cabinets. We are going to hopefully do false drawers at the bottom that actually open up to store my mixer and other items.  


This may not look like much now, but we are hoping it turns out amazing. He worked with his new router and router table to notch out placement for shelves. Then used his drill press to make holes in order to hold the brackets for shelving. The top 48 inches will be one cabinet with three shelves, and the bottom half will hold the mixer like I show below.  Rob's next step it to make the doors and the front panels for the cabinets.  He made two of these cabinet frames on Sunday and worked very hard. 


Rob was able to create some outside trim for the cabinet he created and then a door below out of some mahogany wood my parents had given us to use. You can't beat free in this project.
He also started to put together a door for the front of where the mixer will be kept.  He wanted to have it look like the two drawers in the inspiration photo, but actually open like a door.  I just leaned it up against the front of the cabinet to see how it would look.  

                                
This is going to be a slow moving process, but that is okay because I can use pretty much everything in my kitchen still.  We are hoping to head to IKEA to check out some butcher block counters soon.  The running total for this entire project so far is $100.  


Thanks for stopping by!

Megan


Saturday, March 31, 2012

Functional Cabinet Storage by Rob & Megan

We have a large cabinet in our kitchen that had a system of three wire drawers installed. They were not functional at all.  We could not pull out the drawers as intended because the support was only on the right side.  As you can tell from the photo below the left side is sagging from the weight of the items in the shelves.  

After checking out the selection at Lowe's we purchased three sets of sliding drawer hardware and the brackets to attach to the back of the cabinet.  After we cleaned out the cabinet our daughter, Wynn, thought it would be fun to show off the usable space. Then Rob began to attach the tracks to the side of the cabinet.


This came out to be $32.00. We had a lot of leftover wood and OSB from other projects.  Rob was able to build three shelves for the cabinet.  


Rob then added the tracks to the bottom of the shelves he built.   Once all the tracks were installed here is what the cabinet looked like afterwards.


We then remembered we had a roll of wallpaper from a previous project.  We lined the drawers with that for now to cover up the wood.


Painting the shelves is the next step...but for now these are a huge improvement for our cabinet.  

Total Cost  - $32 dollars for the sliding drawer hardware from Lowe's. 

Thanks for checking out our project. If you'd like to follow us on Facebook please click the link on our right side bar.  


Rob & Megan

Tuesday, January 17, 2012

Kitchen Cabinet Redo - Beadboard Inserts


We painted our kitchen cabinets a few years ago from our 1980's contractor brown and spray painted our brass handles and knobs to resemble oil rubbed bronze. However, we knew we'd like to update them again.

Here is our kitchen when we moved in...Ugh


Rob began with wall behind the cabinets. He purchased eight foot sheets of beadboard at Home Depot and painted them black. He had to make a few cuts on this side for the electrical outlet and the corner.


The sides of the cabinet were not as easy as they required a double layer of beadboard to match up with the wall section behind it. 

He then took off the doors of all the cabinets. He cut the beadboard to fit inside each of the cabinet faces.  He used wood putty to fill it in.


Rob then had to do a lot of work to match up our new bin pulls rather than the knobs that were previously in place.  He said that it was the most time consuming of all the parts of the project. Rob sprayed painted the old hinges to match the new hardware.


The after pictures...


Hope you enjoyed our transformation.  We will be leaving the upper cabinets open without doors. We plan on wallpapering the back of them and painting the inside as well. I'll post those pictures once we complete that part of the project.

Paint Lowes - $35
Beadboard - $100
Trim - $25
Hardware - $25

Total $185

Rob and Megan