Showing posts with label monogram. Show all posts

Monday, March 3, 2014

Burlap Monogram Sign

I could not just make one burlap monogram present apparently. I made this one for my mother in law. I figure everyone could use something bright in their home during all these dreary winter days we have been experiencing lately. Is it spring yet?  


I picked up the burlap canvas at Michaels and a large pad of scrapbook paper on clearance. I already had the wooden V in my collection. I painted the letter with a mixture of gold and pink paint.  I used spray adhesive to attach the scrapbook paper to the canvas, and then hot glue to attach the wooden letter.

I think I may have to go and get another canvas to make one for myself. Thanks so much for stopping by today.


Monday, February 24, 2014

Burlap Monogram


One of my favorite people in the world is my Aunt. She is so kind and always thinks of others. I thought since I would be seeing her soon that I would make something forher for spring.  I had purchased a burlap canvas a few weeks back at Michaels, and knew I would use it soon. After seeing all the beautiful Hometalk Michaels Pinterest Party projects that were shared last week I decided to get to work on my own project.


All the materials I used in this project were from Michaels. I used spray adhesive to attach the turquoise burlap that I bought in a roll for $2.99.  The burlap canvas was $8.99 on sale.  It is approximately 16 inches long.  Then I took the chalkboard tag that I bought in a set of four colors and wrote the year of their wedding anniversary on it. The tags were about $.75 each on sale in a pack of four.   I painted the wooden "M" that was around $3 in some tan paint I already had. I glued on a fabric flower from my craft collection and attached a simple jewel I bought on clearance from Michaels last year.  

Thanks so much for stopping by! Enjoy your week.


59866249e0891e0c4ddc55363de2ccb7b8e75a235f06a16d47

Wednesday, February 27, 2013

Spring Monogram

I'll admit that I enjoy and am slighting obsessed with any type of monogram or letter project. I bought a handful of these paper mache V's from Hobby Lobby.   I simply applied some scrapbook paper to the front of it with mod podge.  Thanks to my mother in law for giving me a huge pile of scrapbook paper a few weeks back.  Then added a little flower with a pom center from leftover flowers from my spring jar project.  This will have a home soon somewhere in my house. 


Thanks for stopping by!

Megan

Sharing at:

Monday
Alderberry Hill
The Gunny Sack
The Dedicated House

Home Stories A to Z
Todays Creative

Skip To My Lou
The Rustic Pig
Craft-O-Matic

Tuesday
twelveOeight

If Its Not Baroque
A Diamond in the Stuff
Elizabeth & Co
Romance on a Dime
The NY Melrose Family
The DIY Dreamer

The Winthrop Chronicles
Full Circle Creations

Adventures of a DIY Mom
A to Z Celebrations

Wednesday
Southern Lovely
We Like To Learn As We Go
The Shabby Creek Cottage
Someday Crafts

Thursday
A Glimpse Inside
Seven Alive
52 Mantles
Fireflies and Jellybeans
Bloom Design

Momnivores Dilemma
Saving 4 Six

The Taylor House

Friday
One Project Closer
504 Main
Redoux Interiors
The Grant Life
Just Us Four
Thrifty Handmade Days

One Creative Mommy

Saturday

Too Much Time On My Hands
Tutus and Tea Parties
Classy Clutter
Its Overflowing


Sunday
Nifty Thrifty Things
Flamingo Toes
Twigg Studios
Uncommon Designs
I Gotta Try That


Thursday, December 6, 2012

Burlap Wreath

Maybe after the holidays I will get off my letter kick. I just cannot seem to stop using them in my craft projects. I am all about having easy and cost effective holiday gifts. I made this easy wreath for my mother-in-law. Don't worry she will not see it on my blog.  I grabbed a wire wreath, mod podge,  1.5 wired burlap ribbon from Amazon, a paper mache V from Hobby Lobby, furniture tacks from Jo-Ann's, and a piece of scrap fabric that I had gotten at Jo-Ann's for another project.


I simply cut the strips of burlap and twisted them around the metal wreath form.  It was quick and easy. I did it during a episode of Mickey Mouse Clubhouse. You can tell I really need a distraction while watching that. Then I mod podged the fabric that I cut to the paper mache letter, which I did later on while watching Top Chef.  I am trying to get a lot done during television shows. Once it was dry I attached the tacks to the letter.  

The total cost for this wreath was approximately $30, which was much less expensive than the wreaths I had my eye on in the Etsy shops I had checked out.

Thanks for stopping by!

Megan


Sharing at:

Monday
Alderberry Hill
The Gunny Sack
The Dedicated House
Adventures of a DIY Mom 
Home Stories A to Z
Todays Creative

Tuesday
Uncommon Designs
A Diamond in the Stuff
Elizabeth & Co
Romance on a Dime
The NY Melrose Family
The DIY Dreamer
Claiming Our Space
The Winthrop Chronicles
Full Circle Creations

Wednesday
Southern Lovely
We Like To Learn As We Go
The Shabby Creek Cottage
Someday Crafts
High Heels & Grills

Thursday
The Taylor House
At The Picket Fence
Live Laugh Rowe
A Glimpse Inside
Seven Alive
52 Mantles
Fireflies and Jellybeans
Bloom Designs
House of Hepworths
Momnivores Dilemma
Western Warmth
Saving 4 Six

Friday
One Project Closer
504 Main
Redoux Interiors
Craftionary
The Grant Life
Just Us Four
Thrifty Handmade Days
Tatertots & Jello
Fresh Eggs Daily

Saturday

Too Much Time On My Hands
Tutus and Tea Parties
Classy Clutter
Its Overflowing

Sunday

Nifty Thrifty Things
Flamingo Toes
Twigg Studios
C.R.A.F.T.
My 1929 Charmer
Brassy Apple 

Sunday, November 11, 2012

Faux Leather Letter

I was inspired by this project by Being Brook to create a similar monogram. I purchased some vinyl from Jo-Ann's on clearance. Then simply traced the shape with a sharpie on the back side of the vinyl. Then I used pliers to cut down the tack so that I could glue them on to the wooden letter. 


I added the letter to one of my floating shelves in my living room. The entire project cost about $3 bucks. I am hoping to try and do a larger set or an entire word now that I know how easy this project is for me to complete. Thanks for stopping by.

Megan 


Monday
Alderberry Hill
The Gunny Sack
The Dedicated House
Adventures of a DIY Mom 
Home Stories A to Z
Tip Junkie
Todays Creative

Tuesday
A Diamond in the Stuff
Elizabeth & Co
Romance on a Dime
The NY Melrose Family
The DIY Dreamer
Claiming Our Space
The Winthrop Chronicles
Full Circle Creations
Pincushion Creations
Primitive & Proper

Wednesday
Southern Lovely
We Like To Learn As We Go
The Shabby Creek Cottage
Someday Crafts
High Heels & Grills
Mom on Timeout

Thursday
The Taylor House
At The Picket Fence
Live Laugh Rowe
A Glimpse Inside
Seven Alive
52 Mantles
Fireflies and Jellybeans
Bloom Designs
House of Hepworths
Momnivores Dilemma
Western Warmth
Saving 4 Six

Friday
One Project Closer
504 Main
Redoux Interiors
Craftionary
The Grant Life
Just Us Four
Thrifty Handmade Days
Tatertots & Jello
Fresh Eggs Daily

Saturday
Too Much Time On My Hands
Tutus and Tea Parties
Classy Clutter
Its Overflowing

Sunday
Nifty Thrifty Things
Flamingo Toes
Twigg Studios
C.R.A.F.T.
My 1929 Charmer
Brassy Apple 
Impatiently Crafty

Wednesday, October 17, 2012

Easy Monogram Project

I was trying to think of a gift idea this weekend and wanted to use only materials from my craft stash. I've been trying to avoid buying anything new lately because I feel like I have enough materials on hand. This is all do the Project Overhauling challenge I participated in.
October Overhauling
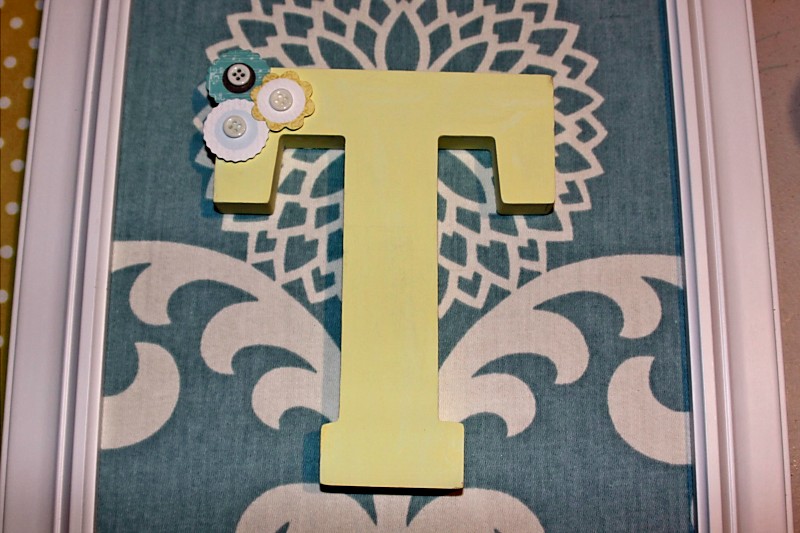
I had some leftover fabric from my lampshade recover project, and then my project started from there.  I took a frame that I had not used before and covered the cardboard piece included with it with fabric. I took out the glass from the frame because it is not needed.

I glued the fabric onto the cardboard and then placed it inside the frame.  Next I painted a wooden letter that I had gotten on clearance a few weeks ago. I had hoped that I could find a way to make something for a friend with it.  I painted it with leftover paint that I had, and added some flower stickers onto one of the corners.

Then I glued the letter to the fabric background on the frame.  Because I used materials I had already purchased for other projects the only new purchase was the letter, which was on clearance for $2.00.  I hope that my friend will like her gift.

Thanks so much for stopping by! Don't forget to follow me on Pinterest if you would like. The button is on the right hand side of our blog.

Have a great day.

Megan


Monday
Alderberry Hill
Etcetorize
The Gunny Sack
The Dedicated House
Adventures of a DIY Mom 
Home Stories A to Z
Tip Junkie

Tuesday
A Diamond in the Stuff
Elizabeth & Co
Romance on a Dime
The NY Melrose Family
The DIY Dreamer
Claiming Our Space
The Winthrop Chronicles
Full Circle Creations
Pincushion Creations

Wednesday
Polkadots on Parade
Southern Lovely
We Like To Learn As We Go
The Shabby Creek Cottage
Someday Crafts
High Heels & Grills
Mom on Timeout

Thursday
The Taylor House
At The Picket Fence
Live Laugh Rowe
A Glimpse Inside
Seven Alive
52 Mantles
Fireflies and Jellybeans
Bloom Designs
House of Hepworths
Momnivores Dilemma
Western Warmth

Friday
504 Main
Redoux Interiors
Craftionary
The Grant Life
Just Us Four
Thrifty Handmade Days
Tatertots & Jello
Fresh Eggs Daily

Saturday
Too Much Time On My Hands
Tutus and Tea Parties
Classy Clutter
Its Overflowing

Sunday
Nifty Thrifty Things
Flamingo Toes
Twigg Studios
C.R.A.F.T.
My 1929 Charmer
Brassy Apple 
Impatiently Crafty

Wednesday, July 18, 2012

Wall Monogram with Paper Straw Border

I was able to get some seven to nine inch wall letters from Restoration Hardware's sale for $0.99 a piece last week.  I wanted to do something to freshen up Wynn's room inexpensively.

I picked up a pack of canvases from Michaels the other day on sale, and I also had a 25% off coupon. They ended up being about $2.00 a piece. 


I had some leftover paper straws from a baby shower that I helped out on. I placed the straws around the edges of the canvas.  
 Then I placed the letters where I wanted Rob to screw them in, and he screwed them in through the back into the hole where you would hang the letters on the wall.


Here is a close up of the final product. It brings a little pink into her mainly blue room.  I like how it cost under ten dollars to create. 

Thanks so much for stopping by! 

Megan


We enjoy linking up to the following parties:


htt://www.theshabbycreekcottage.com/
http://www.livelaughrowe.com/
http://weliketolearnaswego.blogspot.com
http://www.bearrabbitbear.com
http://simplydesigning.blogspot.com
http://www.twosasters.com/
http:raisingoranges.blogspot.com
http://tatertotsandjello.com/  
http://www.justusfour.com