Thursday, October 30, 2014

Whooo is the Mother? Baby Shower Game

We played this cute game while the mom to be opened gifts at the baby shower we hosted this weekend. Here is a direct link to print it out the owl game for yourself. Pin it for later so you can use it in the future. I made it using a free clipart picture and then put it all together using the great features on PicMonkey.  


I was proud of Rob. He got one correct. :)  I knew some of these would be tough, but it was fun to play. There were a few people that were able to get them all correct. The prizes for the game were adorable makeup bags I found at Target, and they were filled with some fun goodies.  I added a nail polish, and a manicure set from the dollar aisle from Michaels. I had some leftover owl stickers from Valentine's Day sale at Michaels. I just put the sticker on the front, and thought it would be nice for the owner to remove the sticker if they wanted.

Thanks for stopping by as always.

Monday, October 27, 2014

Owl Baby Shower

This weekend we celebrated a beautiful momma to be with an owl themed little girl shower. I'll first share this amazing cake by my friend, Jes. She is incredible, and literally just makes beautiful cakes like this for fun. She can see an image, and pretty much recreate anything. The best part was we actually ate only at the back of the cake, because the mom to be was wincing when we suggested that we cut the front. She took the front half home for leftovers.


The owl sat at top of a wedding cake stand that was used for a friend's wedding previously. This was also paired with many other desserts and decorations. Another sweet friend made the beautiful sign for the new baby.
How sweet are these owl treats? They were amazing, and had a cream cheese filling.  I may or may not have had several of these.

I created this adorable guest book plate for everyone to sign for the baby. I cut out an adhesive vinyl owl and simply placed it in the center of the plate. The ceramic plate came from Target for about $4. I purchased a Sharpie paint pen for ceramic surfaces and everyone signed it. I also wrote on the back the occasion and date of the shower. I purchased the white frame on stand from the Michael's dollar aisle, and I placed them throughout the shower.

The milk jar glasses from Michaels were so sweet. We added a vinyl label that I cut out on my Silhouette, and Jes wrote all of the guests names on them. We had to use our favorite party item...the paper straws too.

I put a Whooo's Hungry sign on the main table, and you can see we had plenty of delicious goodies.

We kept the decorations simple. I bought a few ceramic owls from Michaels and spray painted them in the party colors. Wynn let me borrow her precious W and it just happened to match the party decorations perfectly.  The baby's middle name is Love, and that is why I added the word love next to the W.  Another frame sign was labeled gifts, and the guests placed them on the ground in front of this desk.


I cut out a vinyl "baby girl" saying to place on a plain white canvas. It went great behind the chair for the mom of honor. I found the cute owl pillow at a kids consignment sale, and it was the perfect pillow for the mom to be's chair.

The owl wreath hung on the door where guests entered. It was a huge hit with the party guests, and many of them said they knew what house to come in since I had shared it on the blog earlier last week.
I scattered a few more decorations around the room to add a little bit of the shower colors.


My friend, Jes, made two beautiful diaper cakes for the new mom. I adore this sweet owl.
 This diaper tower is topped off with the Angel Dear owl mini blanket. It is the perfect topper.

I bought this chipboard album from Michaels, and created a book for the guests to write their thoughts to the baby. I stamped each page of the book with a pink owl.

Here are Jes and I with the mom to be, Kirsten. She was certainly glowing, and she told us it was the most amazing party anyone had every thrown for her. That made me smile!


Thursday, October 23, 2014

PicMonkey Franken Pet Halloween Contest

Have you had the opportunity to use PicMonkey before? I use it all the time for blogging and my personal photos. It is a great site that offers a way to edit photos, and even create printable graphics as well. If you'd love to try out the PicMonkey Royale membership features just check out this link. You will have access to many more images, fonts, etc.

Right now they are hosting a Franken Pet Halloween Contest along with Rover on the PicMonkey site. Rover is a online pet sitting service website. You can connect with pet sitters from your area, and book a sitter for your pet through this trusted site. Use the coupon code Pinteresting20 for a discount for Rover right now.

All you have to do is snap a picture of your pet or even a pet you know. Then you use the fun Halloween features on PicMonkey to make the pet look scary or funny for the Halloween holiday.  

Here is my dog, Lance, that I made ready for Halloween. He loves to hear the word treat, and I know he will love it when Halloween comes along. He always gets an extra bone that day.

Once you've created your photo masterpiece just share it on either Twitter, Facebook, Pinterest, Instagram, Google+ or Flickr using the hashtag #Frankenpet. 

You will be entered into the contest to win year of PicMonkey Royal Membership benefits. This gives you access to some great features on their site.  You can also win the following:
Runners-up will win a year of PicMonkey Royale and a $25 giftcard to Petco.

Can't wait to see your pets in their Halloween pictures.


Wednesday, October 22, 2014

Target Giveaway Winner!

Thanks to all of you who responded to my Facebook contest for a $25 gift card to Target!


The winner of the contest is Elizabeth Bracken Boozer who said "Clothes - my kids are growing like weeds!" Please message me with your email address, and I will send you an electronic gift card asap.

Look out for future contests on my Facebook page. Be sure to like our page in order to get the information in your news feed.

We hope you have a great day! Be sure to check out some of the fun projects I've shared using items from Target.


Monday, October 20, 2014

Owl Wreath for Baby Shower


I have a baby shower that I am hosting along with friends coming up this weekend. I was so excited about this adorable wreath I'm sharing it early. I basically combined two ideas that I found..  The Country Living Owl Wreath and Catch My Party Owl Ornament were both inspiring ideas I found when searching for the Owl themed baby shower. I thought together they could make a Mom and baby owl wreath for the baby shower. This could easily just be an owl wreath for perfect for fall if you left off the baby if you wanted to do that.

I started out with a vine wreath that I purchased from Michaels.  I picked up a set of napkin rings from the dollar aisle in Michaels, and they were marked down 60%. I purchased two packages because each  came with a green and a pink. The colors of the shower are pink and orange, and so these pink napkin rings were perfect for the eyes of the owl. I just slipped the ring section in between the wreath pieces and it was not something I needed to attach with glue.  Then I added a piece of orange cardstock for the beak with a bit of glue.
I cut out two wings from a single piece of brown felt. Then I used some glitter glue to add some quick details to the wings.
I bought a four pack of glass ornaments from Michaels. I took some leftover pink ribbon and filled the ornament with it. 

I cut out some felt pieces for the heart, beak and wings. I glued everything on with my glue gun, and added a felt flower to make it look like a little girl owl.  I used some sitcker eyes as well. I tied it on the bottom of the wreath with some ribbon.  

There you have it. It was an easy wreath to pull together, and I love how it looks like a Mom and baby owl together. Thanks for stopping by!


Sunday, October 19, 2014

Quick and Cute Halloween Gift

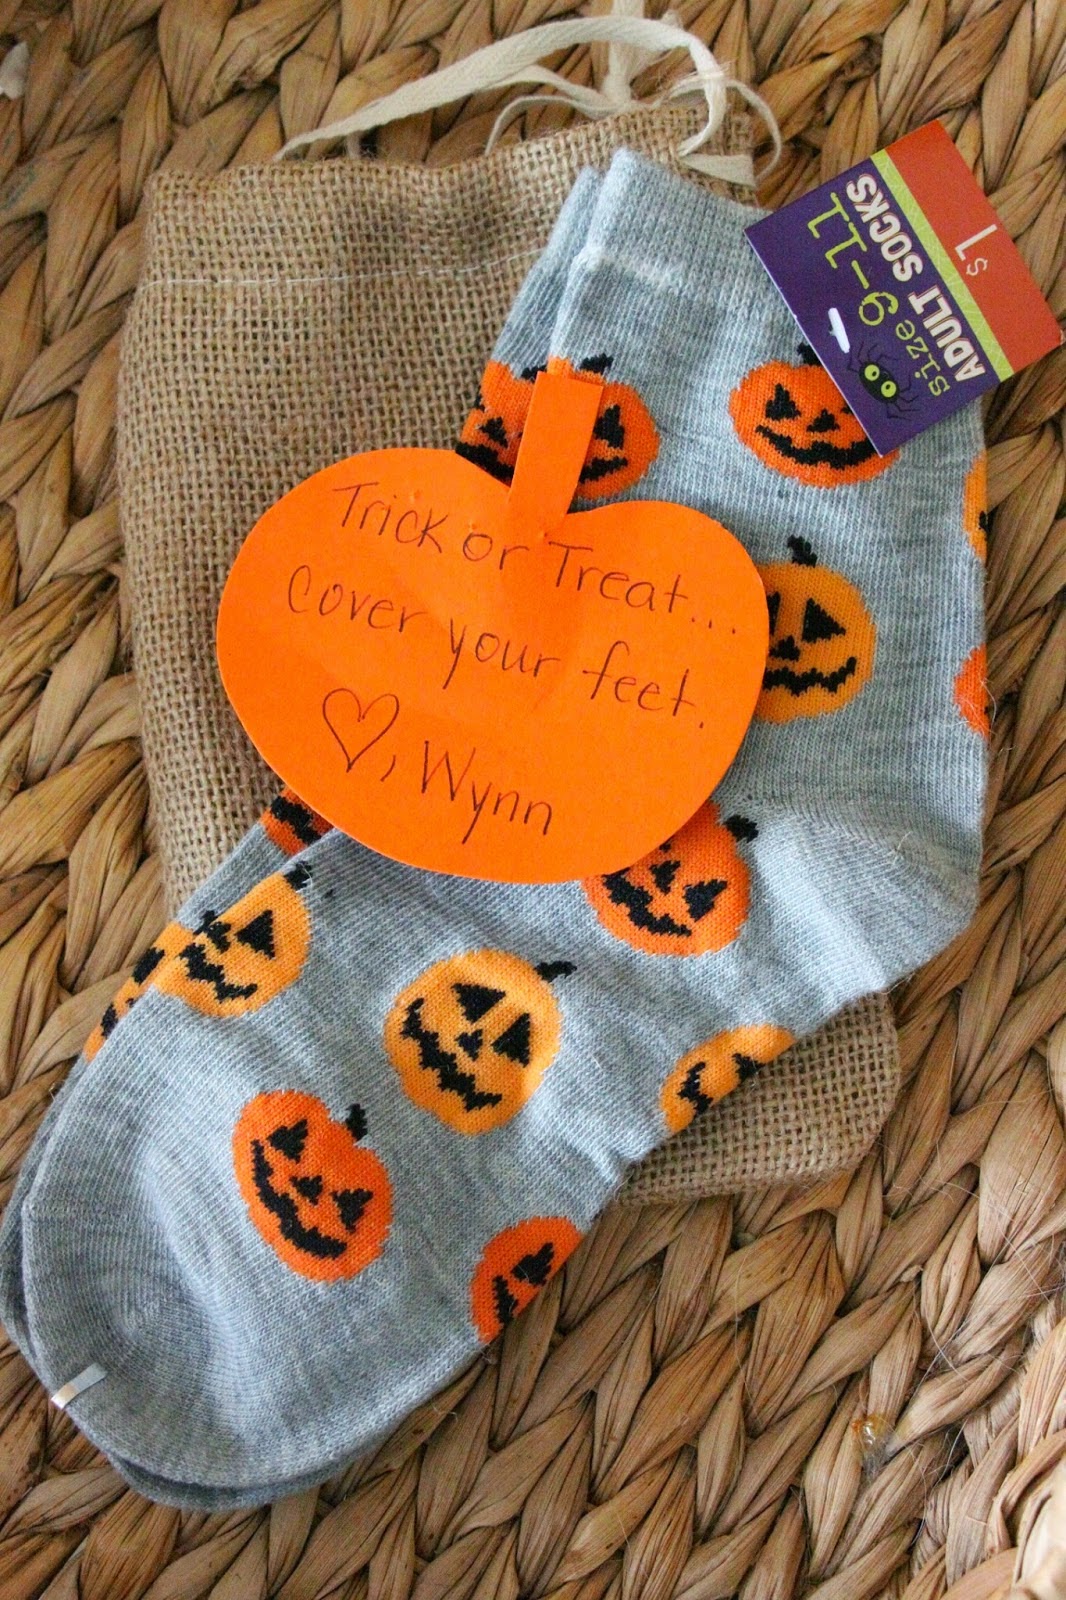
It is no surprise to anyone that knows me that I love to give little gifts to friends, family and teachers. For Wynn's school teachers this year I thought I'd send in a little happy for Halloween. There are a lot of teachers in her school that interact with Wynn on a daily basis. I needed to come up with something quick and budget friendly.  Who am I kidding? I would make it quick and budget friendly even if it was for one person. 


I was scouring the always fun Target Dollar Spot on my lunch hour.  I grabbed several pairs of Halloween socks for a $1.  I had purchased some burlap pouches from the Dollar Spot last year, and they have them again this year so I grabbed a few more.

I then got to brainstorming on a simple card to go along with it. I cut out some pumpkins out of cardstock, and attached them with a simple strip of roll on adhesive to the pouch. I did not want to do anything to permanent because I wanted the teachers to use the pouches again in a way that works for them. I knew it might not be appropriate to say "trick or treat...smell my feet", and so this is what I came up with instead.


Hope you have a great day! Thanks for stopping by as always. I love sharing fun and simple ideas like this with you.

Monday, October 13, 2014

Tour Through Blog Land

I was invited by Sharon from Elizabeth & Co to join in on the tour through blog land series. When I first started blogging I found Sharon's blog through a link party. I loved her checking out her furniture projects and handmade wreaths. I soon realized that she lived in my town, and that I lived around the corner from her a few years ago. Blogging is actually a smaller world than I originally thought.

 This adorable set was just recently shared by Sharon. She has such a great eye for colors and can really transform any piece of furniture into something beautiful.

She hosts weekly Be Inspired parties where you can link of projects of any kind. It is a great place to find new bloggers that you may have never followed along with before. This is how I found one of my favorite bloggers I am sharing below.


 Sharon and her talented friends hold vintage tag sales several times a year in an adorable house in Westminster, MD. It is very popular, and sometimes it seems like they literally shut down the road with all the people trying to get in. They always have something fresh and new, and their prices are extremely reasonable. That is probably why people are rushing to check out what kinds of goodies they have each sale.


Now on to the questions and answers I'm sharing about our blog. The first question is...


What are we working on?

Right now we have a few DIY projects in the midst in our home. The major one is the basement project. Rob is working on studding out walls for the unfinished portion, and we will be turning it into a play room. This room probably will not be finished for a while. We are doing it little by little. Plus, basketball season is about to start in a month and that means Rob will not have much time to work on it. And I will have my hands full with the kiddos.

I've been working on the boys first birthday party and a friend's baby shower. I hope to share both of them very soon.  Hard to believe our boys will be one in three weeks.  Here they are for their 11 month picture last week.

Why do I write about this genre?

We really started this blog as a way of finishing projects. We would always get about 90% down and then get started with something else. The other project sat unfinished for too long. This blog really motivates us to have a finished photo to share. We cannot believe that we have stayed with it especially after the twins were born. But, I have to say that I really enjoy blogging and sharing our projects and ideas. It is also great to follow along with the other amazing bloggers out there.

How does our work differ from other blogs out there?

I do not really think our work is all that different from others. I enjoy sharing what we do in our home, and hope that I can inspire others to try something in their own home as well. Sometimes people look at us and ask us how we get anything done. There are some projects that really take longer than others, but if you are willing to put in the little free time you may have you can make big changes in your own home.

 There are two bloggers that I'd love to share with you today. First up is Jaime from That's My Letter.  She is such a talented person. She builds, sews and crafts.  Her work is so creative and gorgeous. I wish I could be her neighbor and she would teach me how to use all the power tools that she is a master using. Right now she is is the middle of her annual holiday gift idea projects. She is sharing a project a week that you can build for kids. Her most recent playhouse is so cute! Here is a round up of some of my favorite projects she has shared.


Cristina from Remodelando La Casa is another blogger I check out daily. Her projects are so inspiring just like Jaime's. Cristina can handle doing major remodels, building furniture, crafts and interior design. Her mantel displays may be my favorite posts that she shares.  She comes up with a beautiful display for every holiday and season. She is also incredibly sweet, and she lives close to me as well. One of these days I'm going to have to join her at her favorite flea market. She always finds interesting objects at them.

Halloween Witches    Valentine Mantel        Wine Crate Table         Desk Makeover

Thanks so much for stopping by today! I hope you have a great week. Be sure to check out Sharon, Jaime and Cristina if you have a chance.

Thursday, October 9, 2014

Asian Kale Mason Jar Salad


My co-worker and I have started to bring in some mason jar salads for new lunch options. They are so easy to put together. I made this Asian Kale Salad for us during our first week. Then we are bringing in our salad jars once a week from now on and trying new recipes. 


This recipe was adapted from the McCormick website. The ironic part about this is that the McCormick factory is just up the road from my office. Every day when I get out of my car to enter my building I smell a different spice in the air. In case you were wondering it is usually garlic powder that I smell the most often.  Here is my jar ready to be added to my lunch bag.

Here is the recipe for you to try!

Vinaigrette:
 1/4 c rice vinegar
1 tbsp orange juice
1 tbsp packed brown sugar
2 tsp of sesame oil
1/2 tsp of garlic powder
1/2 tsp of ground ginger
1/8 tsp of salt

Salad:
1 lb of kale
1 chopped red pepper
1 can (11 oz) mandarin oranges
1/2 cup of sliced almonds
2 tbsp of chopped green onions

I mixed the dressing with a whisk and poured it inside the mason jar. There was enough dressing made for about three mason jars.  I then placed the chopped red peppers first. Making sure they covered the dressing completely on the bottom of the jar. I rinsed the kale and chopped it up. I discarded the stems and the center pieces. After the kale is dry it goes in for the third layer. At the top I added the mandarin oranges, almonds and green onions.  

When it came to lunch time I dumped out the jar into a bowl and mixed it together. The red peppers really helped the kale not get soggy from touching the dressing all morning in the fridge.


It is especially easy to put together when you are trying to get out the door quickly.  Have a great day everyone!

Wednesday, October 8, 2014

Budget Friendly Pumpkin Party & Giveaway


I wanted to put together a budget friendly fall party for Wynn and her friends. I purchased most of the items from either the Dollar Tree or the Target dollar spot.  I put everything together in less than an hour as well. Quick and cute!  It ended up being Wynn and I partying together at this one. Our house came down with several illnesses at once, and so this meant we were not up for visitors. Ty and Davis enjoyed climbing all over the place and banging on the table. 

I am sharing this along with several other wonderful bloggers in the Delightfully Wicked Halloween Hop. I have shared a link to their blogs as well, so make sure you check them out when you have a chance.
I used our long preschool table we had redone and decorated it in our play room. The first item I laid out was a green plastic table cloth. I folded it in half so it still had a bright green color. I purchased it at the Dollar Tree. I also thought the boys small tractor fit in the decor.
I turned these tissue paper flowers into pumpkins by simply adding a green stem out of cardstock. I hung them from the ceiling. I bought the tissue paper flowers from Michaels. I plan on using them at another party later in the month. They were $2 a piece.

I added a cute face to the paper cups with a black marker. I topped the cup off with a green straw to resemble a stem.
I set out a few treats that fit the pumpkin theme well. I purchased some Kraft pumpkin shaped marshmallows, Brach's fall candy mix and some Little Debbie pumpkin snacks. It was easy to display most of these items in glass containers I already had. 
I made place settings very simple. I took a roll of craft paper and cut out squares for place mats. I took the same black marker and wrote names and pumpkin vine. I took the orange plate and attached the same green pumpkin stem from tissue paper flowers to the plate.

I had one simple craft available for the kids. Wynn made a pumpkin bag.  It would also be helpful for them to bring home their extra treats that they wanted for later. All I purchased was some orange paper bags, and I was able to utilize paper for the face from my drawer of paper I already had.
I decorated the chair backs with pumpkins Wynn made last year. I also added a burlap banner from the Target dollar spot on the wall. I purchased some pumpkin boxes for the kids to use for additional little Halloween related items I purchased for them from the dollars spot as well. I will be hanging these out to the kids when we Trick or Treat with them later this month since we were not able to have them over this time.

This is being shared as a part of the Delightfully Wicked Halloween Hop. Be sure to check out the other great ideas being shared today.

Check out the entire Delightfully Wicked Halloween Hop below:


 You could win a block or sign from Blocks Paper PaintClick on the Rafflecopter Link to enter this fantastic Halloween giveaway. a Rafflecopter giveaway


Thank you so much for stopping by today. Enjoy your day and good luck in the giveaway!